Call features
Canceling an outgoing call
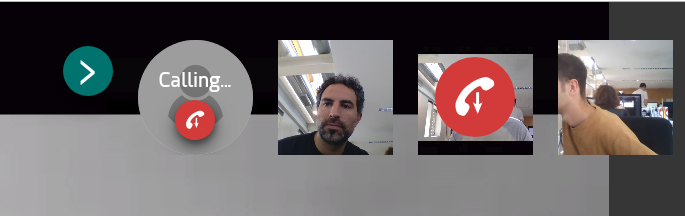
When you are making an outgoing call, a notification will appear and the browser will ring emulating the waiting tone. You can hang up at any time, cancelling the call attempt, by clicking on the red icon  . You can hangup your attempt from the bottom menu or individual participant invites on their specific hangup icons.
Talking to your contact
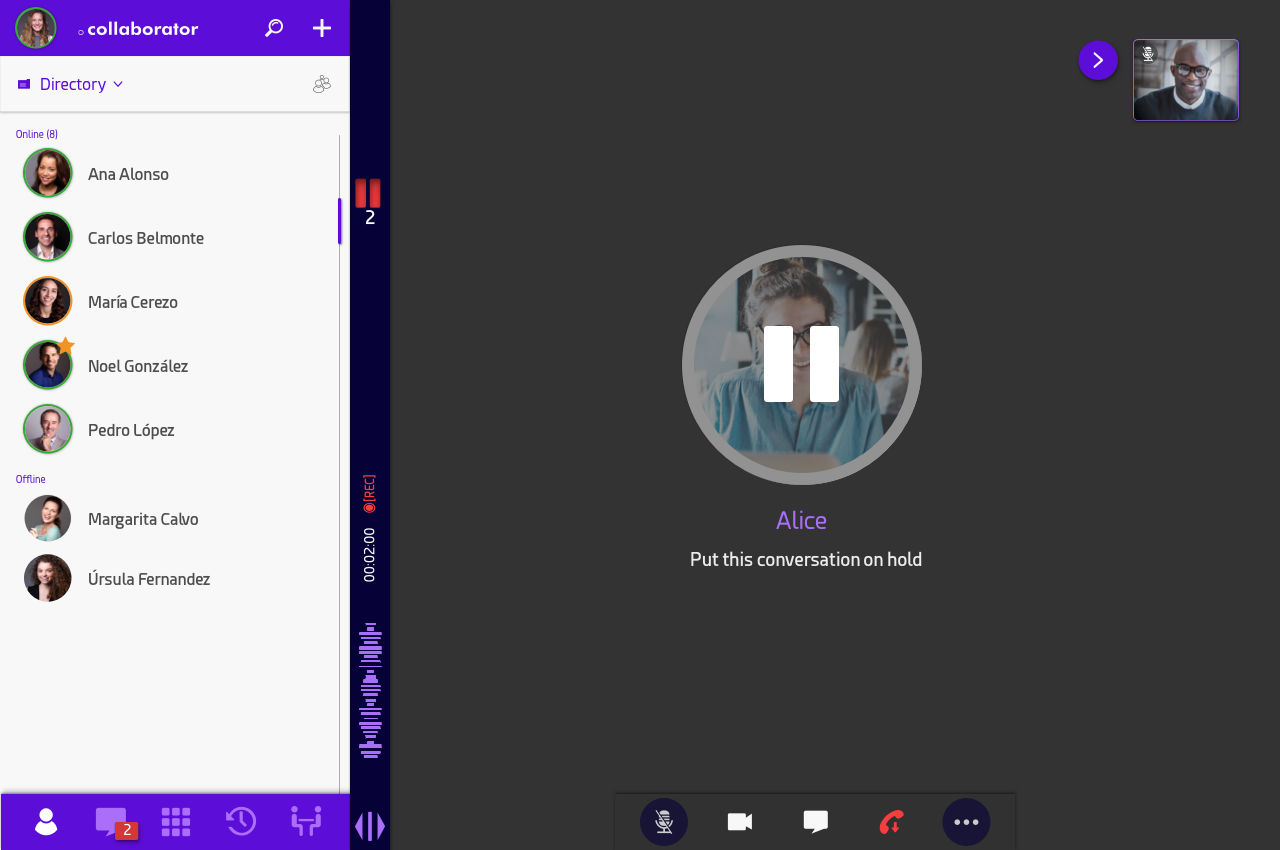
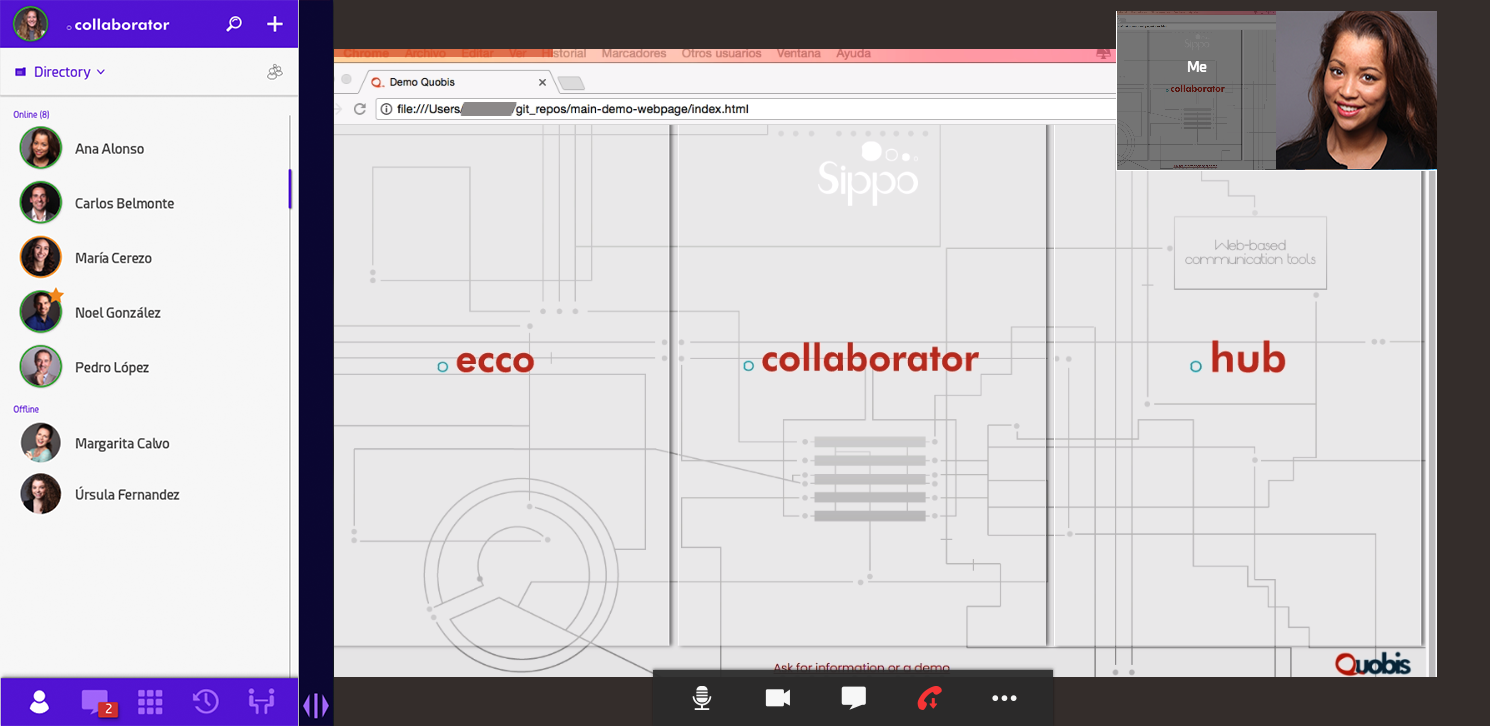
If the contact you are calling accepts the call, the communication will start and you will be able to see and hear the person you called. When the call is ongoing, a few options show up. See the following explanation:
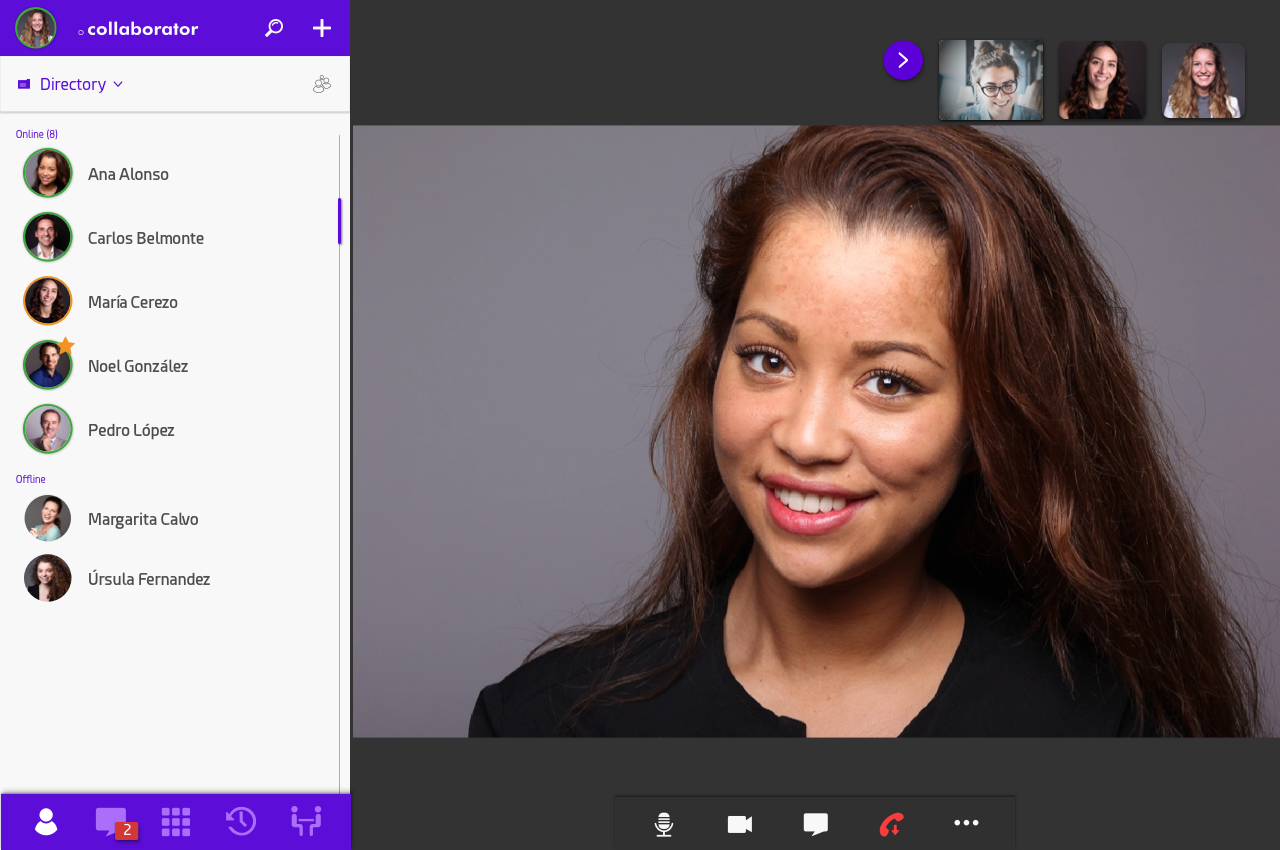
Now, the right section of the application shows your local video recording in the upper right corner, and the remote video taking the rest of the video section. You can click on your local video or on your partner’s in order to select the stream to visualize larger in the application.
You can control the call session using an option bar that will show up at the bottom of the screen, with different icons depending on your deploy.
Basic in-call actions
 Hide menu
Toggle to hide side menu
 Audio on/off
Allow you to control your own audio, turning it on or off
 Video on/off
Allow you to control your own video, turning it on or off
 Start chat session
Creates a chat session with the remote participant(s) of the current conference. This chat is called Conference chat because it is only available during the conference and will be removed after the last user hangs up.
- Hangup
End session, finishing the call
Additionally, while on a call, you can insert DTMF tones using the dialpad panel from the left drawer. Just click the  icon and press the keys to send the desired DTMF tones. Please note that this panel only allows you to send DTMF tones, you cannot use it to dial out during a call.
Advanced in-call actions
Other action buttons will be collapsed inside the tree-dot menu 
 Whiteboard
Allow you to share a digital board where all participants can draw at the same time
 Add participant
Invite an extra participant to join the call in progress. See section Adding participants to a call for details
 Screensharing
Starts a screensharing session
 Hold
HoldPut the call on hold, after it you you can transfer it to other partner
 Recover
Recover a holded call
- Hangup call
Hangup the specific holded call
 Direct transfer
Performs a direct transfer
 Attended transfer
Performs a attended transfer
 Change camera
Allows the user to switch between cameras, if available.
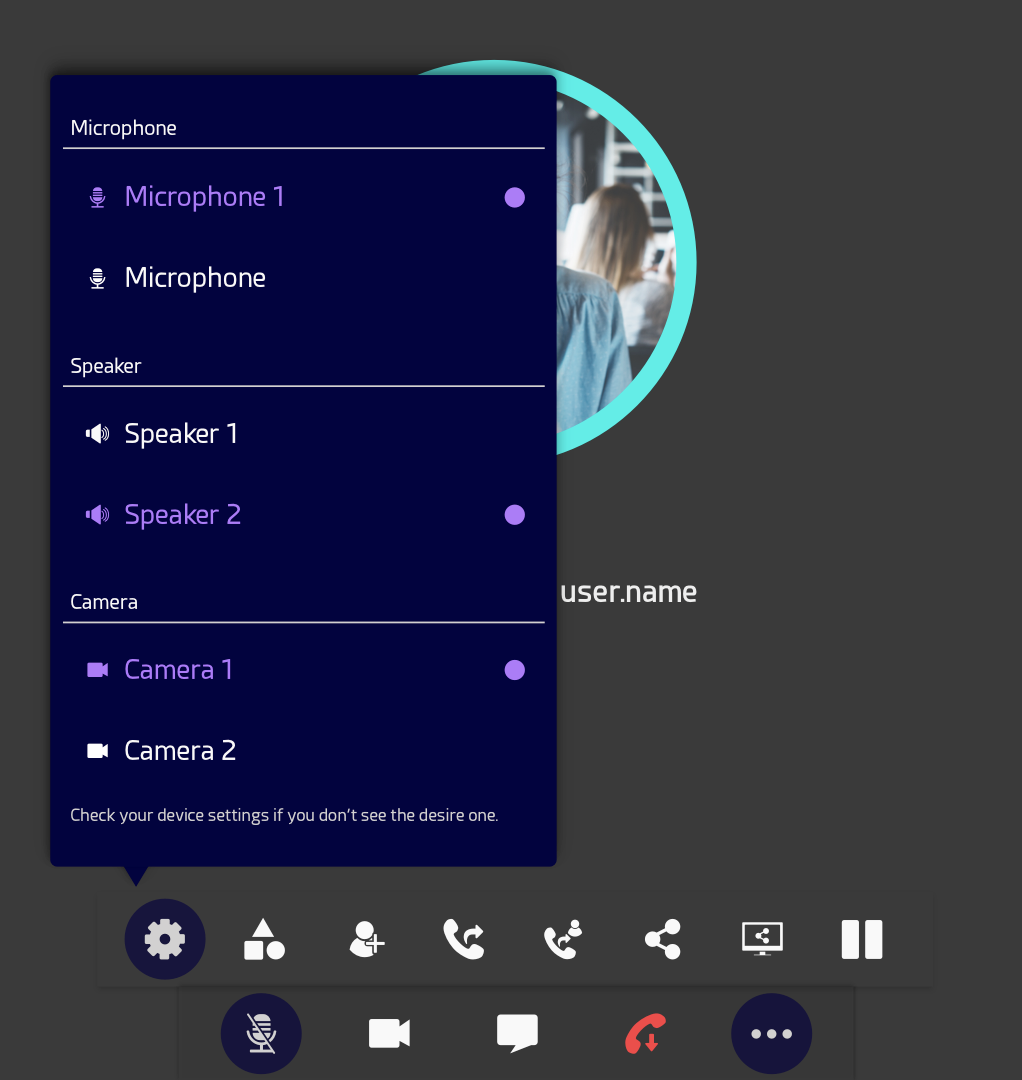
 Change the media device in use
This menu is only shown when more than one device is available:
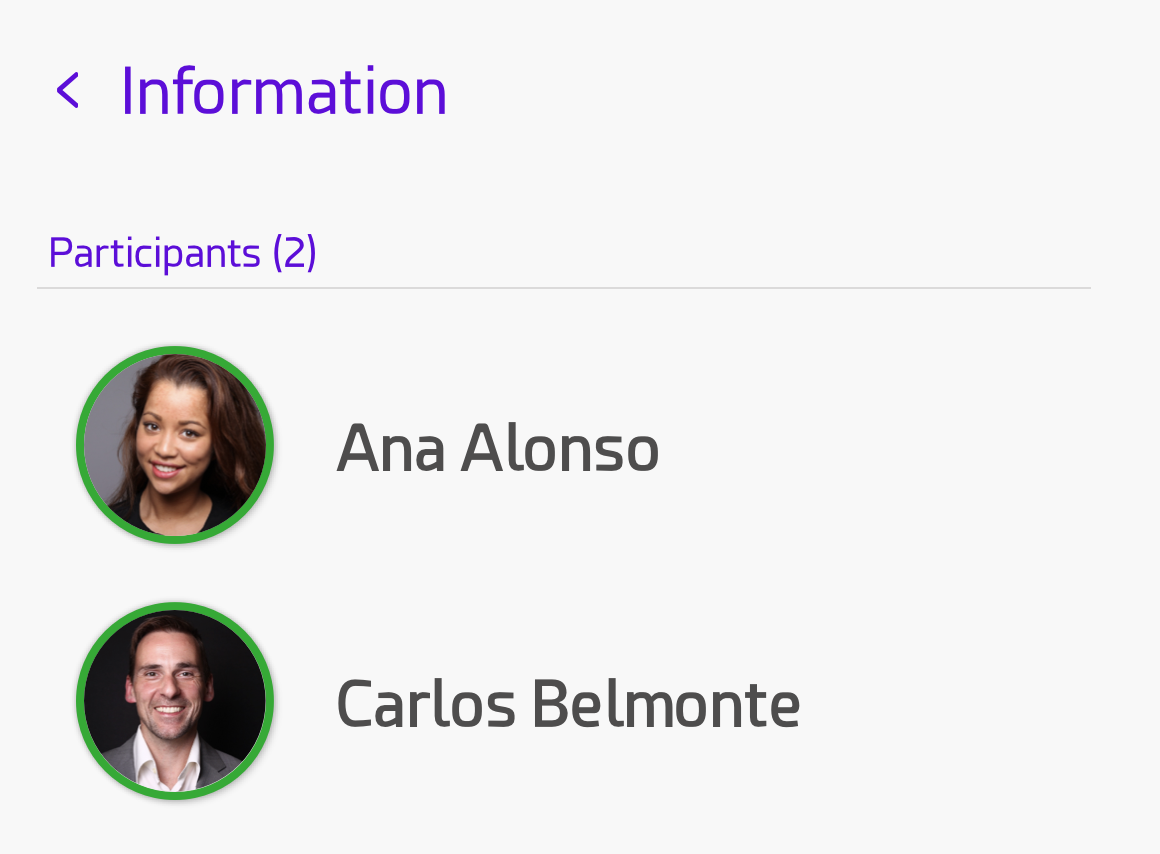
 Info
InfoGives info about the participants in the call. Once the info button is pressed, a list of participants will be shown in the left drawer.
Note
Call information is not available in the iOS and Android apps
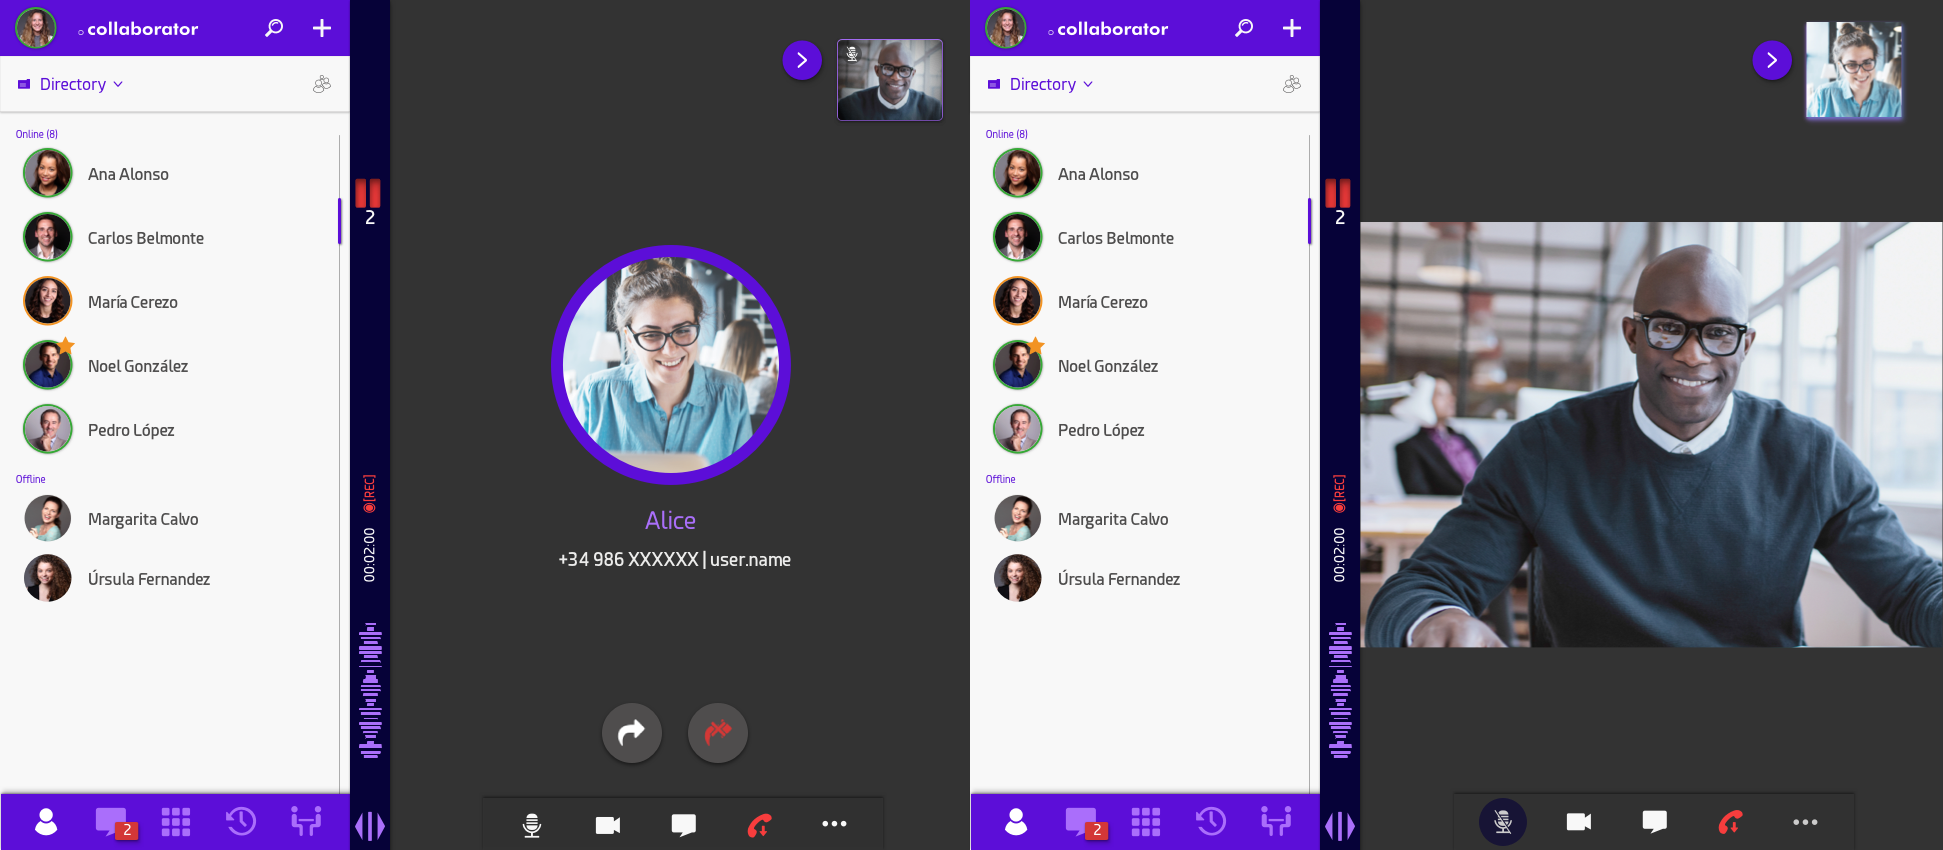
Call holding
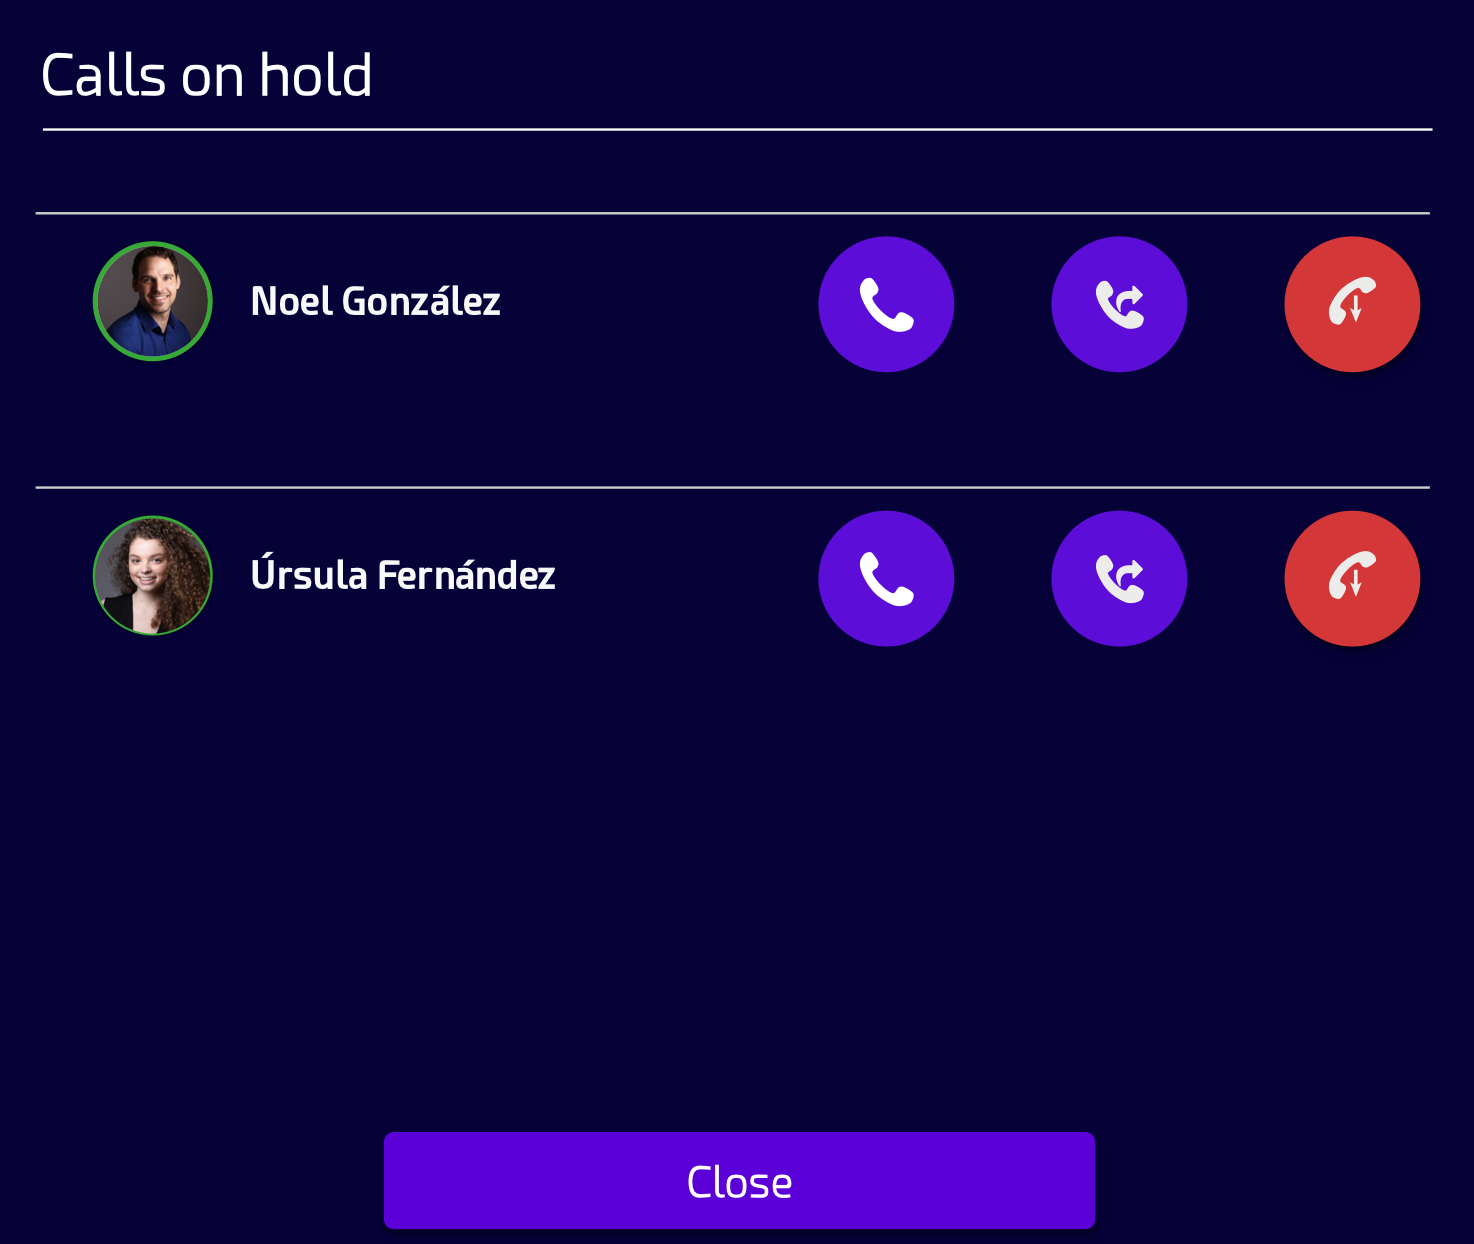
Quobis collaborator has the ability to put calls on hold. That is useful when you want to place a second call or when you want to perform a transfer, as explained in chapters below. In order to put a call on hold, you need to click on the hold button . A new hold icon will be shown on the side panel that will provide you access to your on-hold calls. The number below that icon will show the number of on-hold calls, since a user can have more than one holded call at the same time (three on-hold calls in the example below)
The holded user will see that the person that has initiated the call is on hold state, as the avatar will show the icon below. When the holded user is calling from PSTN or SIP extension, he’ll just hear a “beep”. Please note that there is no “music-on-hold” service.

Once the call has been holded, the user who has put it on hold can click on the hold icon that will give him access to the on hold calls section, where he can see the list of on hold calls.

You can also hold a multi-party call, as showed in the screenshot below where a on hold call has two participants:
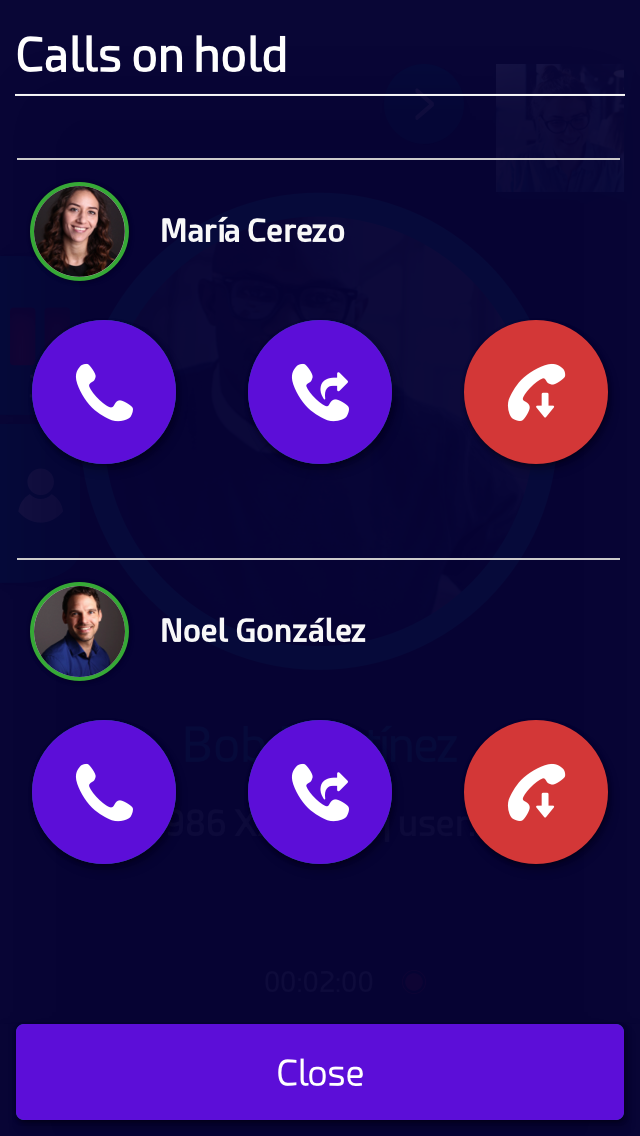
This section is updated in real time, that means that if every participant leaves a holded call, that call will disappear from your list. The available actions for each holded call are:
Recover that holded call.
By clicking this icon, the user will be connected again to that holded call. You can hold and recover the calls as many times as needed. The users will hear a “beep” indicating that the call is no longer holded.Hangup that specific on hold call.
That means that you will leave that holded call. If there is only one participant left, the call will end for him as well. If there are still two or more participantes, they will remain in that call but they will see that you are no longer holded.Direct transfer.
Clicking on this button will open the “direct transfer” dialog as explained in the following chapters. Please note that holded calls with more than one participants cannot be transferred, this icon does not appear.
Call holding in multiparty conferences
When you hold a multi-party call, the call will appear as holded on your side (like in one-to-one calls) but the main difference here is that the participants are able to talk between each other as they are still in the conference. That means that the participants will see you as “holded” but, despite that, they won’t notice any change. If you want to terminate that conference, you’ll need to recover that holded call and expel them one by one by clicking on the thumbnails. That’s the same behavior that you see when you add participants to a call, if you leave the call, the rest of participants will remain in the call.
On the other hand, please note that a user which is taking part in a conference with holded users can also hold himself.
Adding participants to a call
While in a call, a user may want to add more contacts to the call. This can be achieved in a two click process. At the bottom of the screen, inside the three-dot menu you can find the add participant icon . You can use this button to add another participant to the call. After pressing this button, a new section named “Invite a new participant” will appear on main drawer and will provide you two options to add a new participant:
Add a participant from your agenda: you agenda will be shown and you’ll be able to select one user and add him/her to the current conference (audio or video).
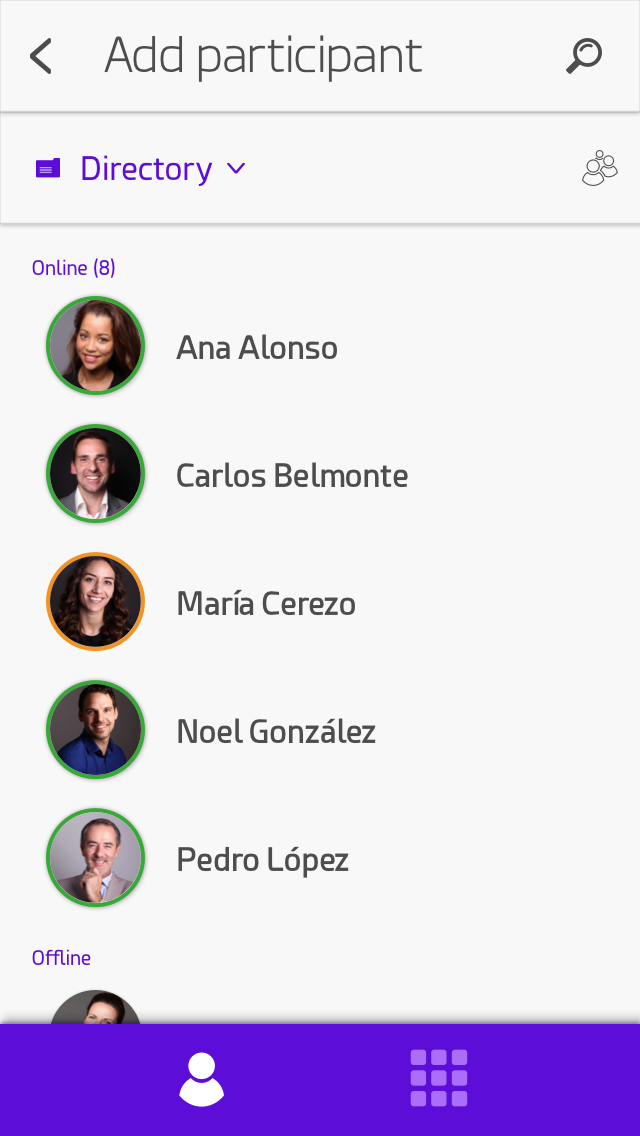
Add a participant by dialing it’s phone number: if the person that you want to add is not in the agenda, you’ll be able to type or press the buttons in order to dial the extension or phone number.
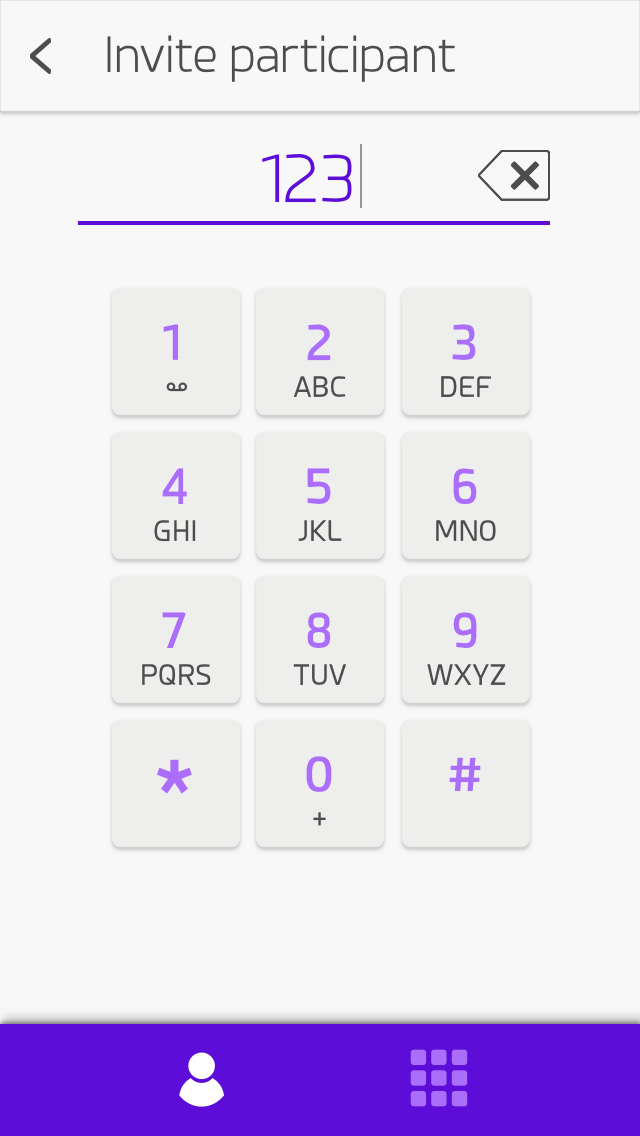
While adding a participant, clicking on the “back” arrow will get you to the section you were before.
Direct transfer
After making a call a user may want to transfer it to one of his contacts. This can be achieved in a two click process. At the bottom of the screen, inside the three-dot menu you can find the direct transfer icon .

By clicking on it the user will be prompted with a panel on the left side of its screen, just like in the case of Adding participants to a call. From here you can either select a contact from your contact list or just dial in the number to transfer the call to. After performing a direct transfer the call between both original users will be closed and a new call session will begin, now with the contact just selected for transferring the call to.
Note
Please note that only one-to-one calls can be transferred. In other words, if a user is in a call with several participants (multiparty call) the transfer button won’t be shown in the user interface.
Attended transfer
Quobis collaborator supports attended transfers, which is a type of transfer where before actually transferring to the destination, the call is put on hold and another call is initiated to confirm whether the end destination actually wants to take the call or not.
During an active call between A and B, if B wants to do an attended transfer of A to C, B needs to follow the next steps:
B uses the dedicated button to perform an attended transfer on his toolset:

A will then see that he has been put on hold (in case A is another collaborator user) and also hear a music on hold.
On the other hand, B will be prompted to use the contact list or the dialpad to dial to the transfer target (user C)
B selects a transfer target for the call, selecting if the call is done with audio or video. That will originate a new call to the user C (the target of the transferred call).
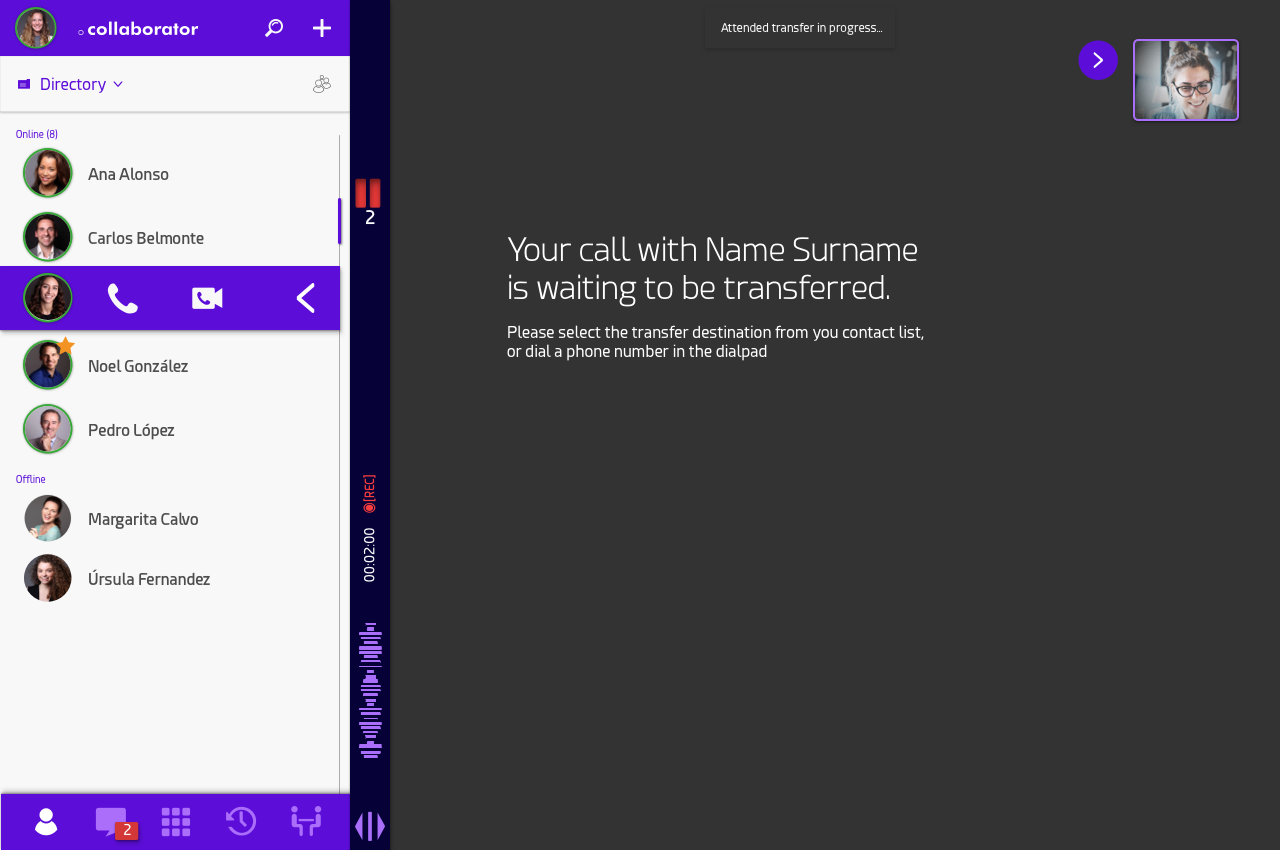
Once C receives the call and starts talking to with B, the toolset of B is simplified to provide the options available during the transfer:
- Complete the transfer and connect A with C.
 Cancel and recover the call between himself and A.
If B decides to proceed with the transferring process, C will receive an incoming call from A, in order to finally accept the call. If during the process, B decides to hangup the call with C or cancel the transfer, the call with A will be recovered,.
Conference chat
This feature allows users to initiate a chat session with the participants of the current call. The conference chat cannot be accessed from the the chats list tab, as usually done; instead it is opened, during a call, from the in-call menu located at the bottom of the screen, the user must click and the new chat will be displayed on the left side of the screen with “Current Call” as title instead of the contact’s name. Notifications will also appear on this icon as a red bubble indicating new incoming messages  .
.
This chat will only be available during the call session and will be removed once all participants hang-up, this means that even if the call is transferred to other contacts, or a user enters or leaves, the chat will not be eliminated and participants will be able to see the chat’s full history.
As with any other chat, participant information is also available to the user by clicking on the  icon in the upper-right corner.
Screensharing
With Quobis collaborator it is possible to share the screen during a call. To do it click on the button Screensharing once the call is established. When active, the icon should appear green as activated. The application will let you choose what do you want to share. You can share the desktop or a single application window. To share just click on the element that you want and click on “Share” button in the dialog box:
To stop the screensharing session, simply click again into the button or stop the sharing using the browser button. The icon will change back to its non-active base color.
Note
The native desktop version of Quobis collaborator will only allow to share the whole content of the screen, no application window can be selected to share individually.
This feature is not available in mobile environments. Mobile users can see other user’s screenshare, but are not able to share their own screen.
Whiteboard
To start a whiteboard session, during a call click on the whiteboard button . When active, the icon should appear green as activated. The image on your selected screen, along with the forms that you draw on it will be forwarded to your partner on the other side of the call. The following image shows an example of the features that are available for the shared digital whiteboard. Both users can edit the same image in real time.
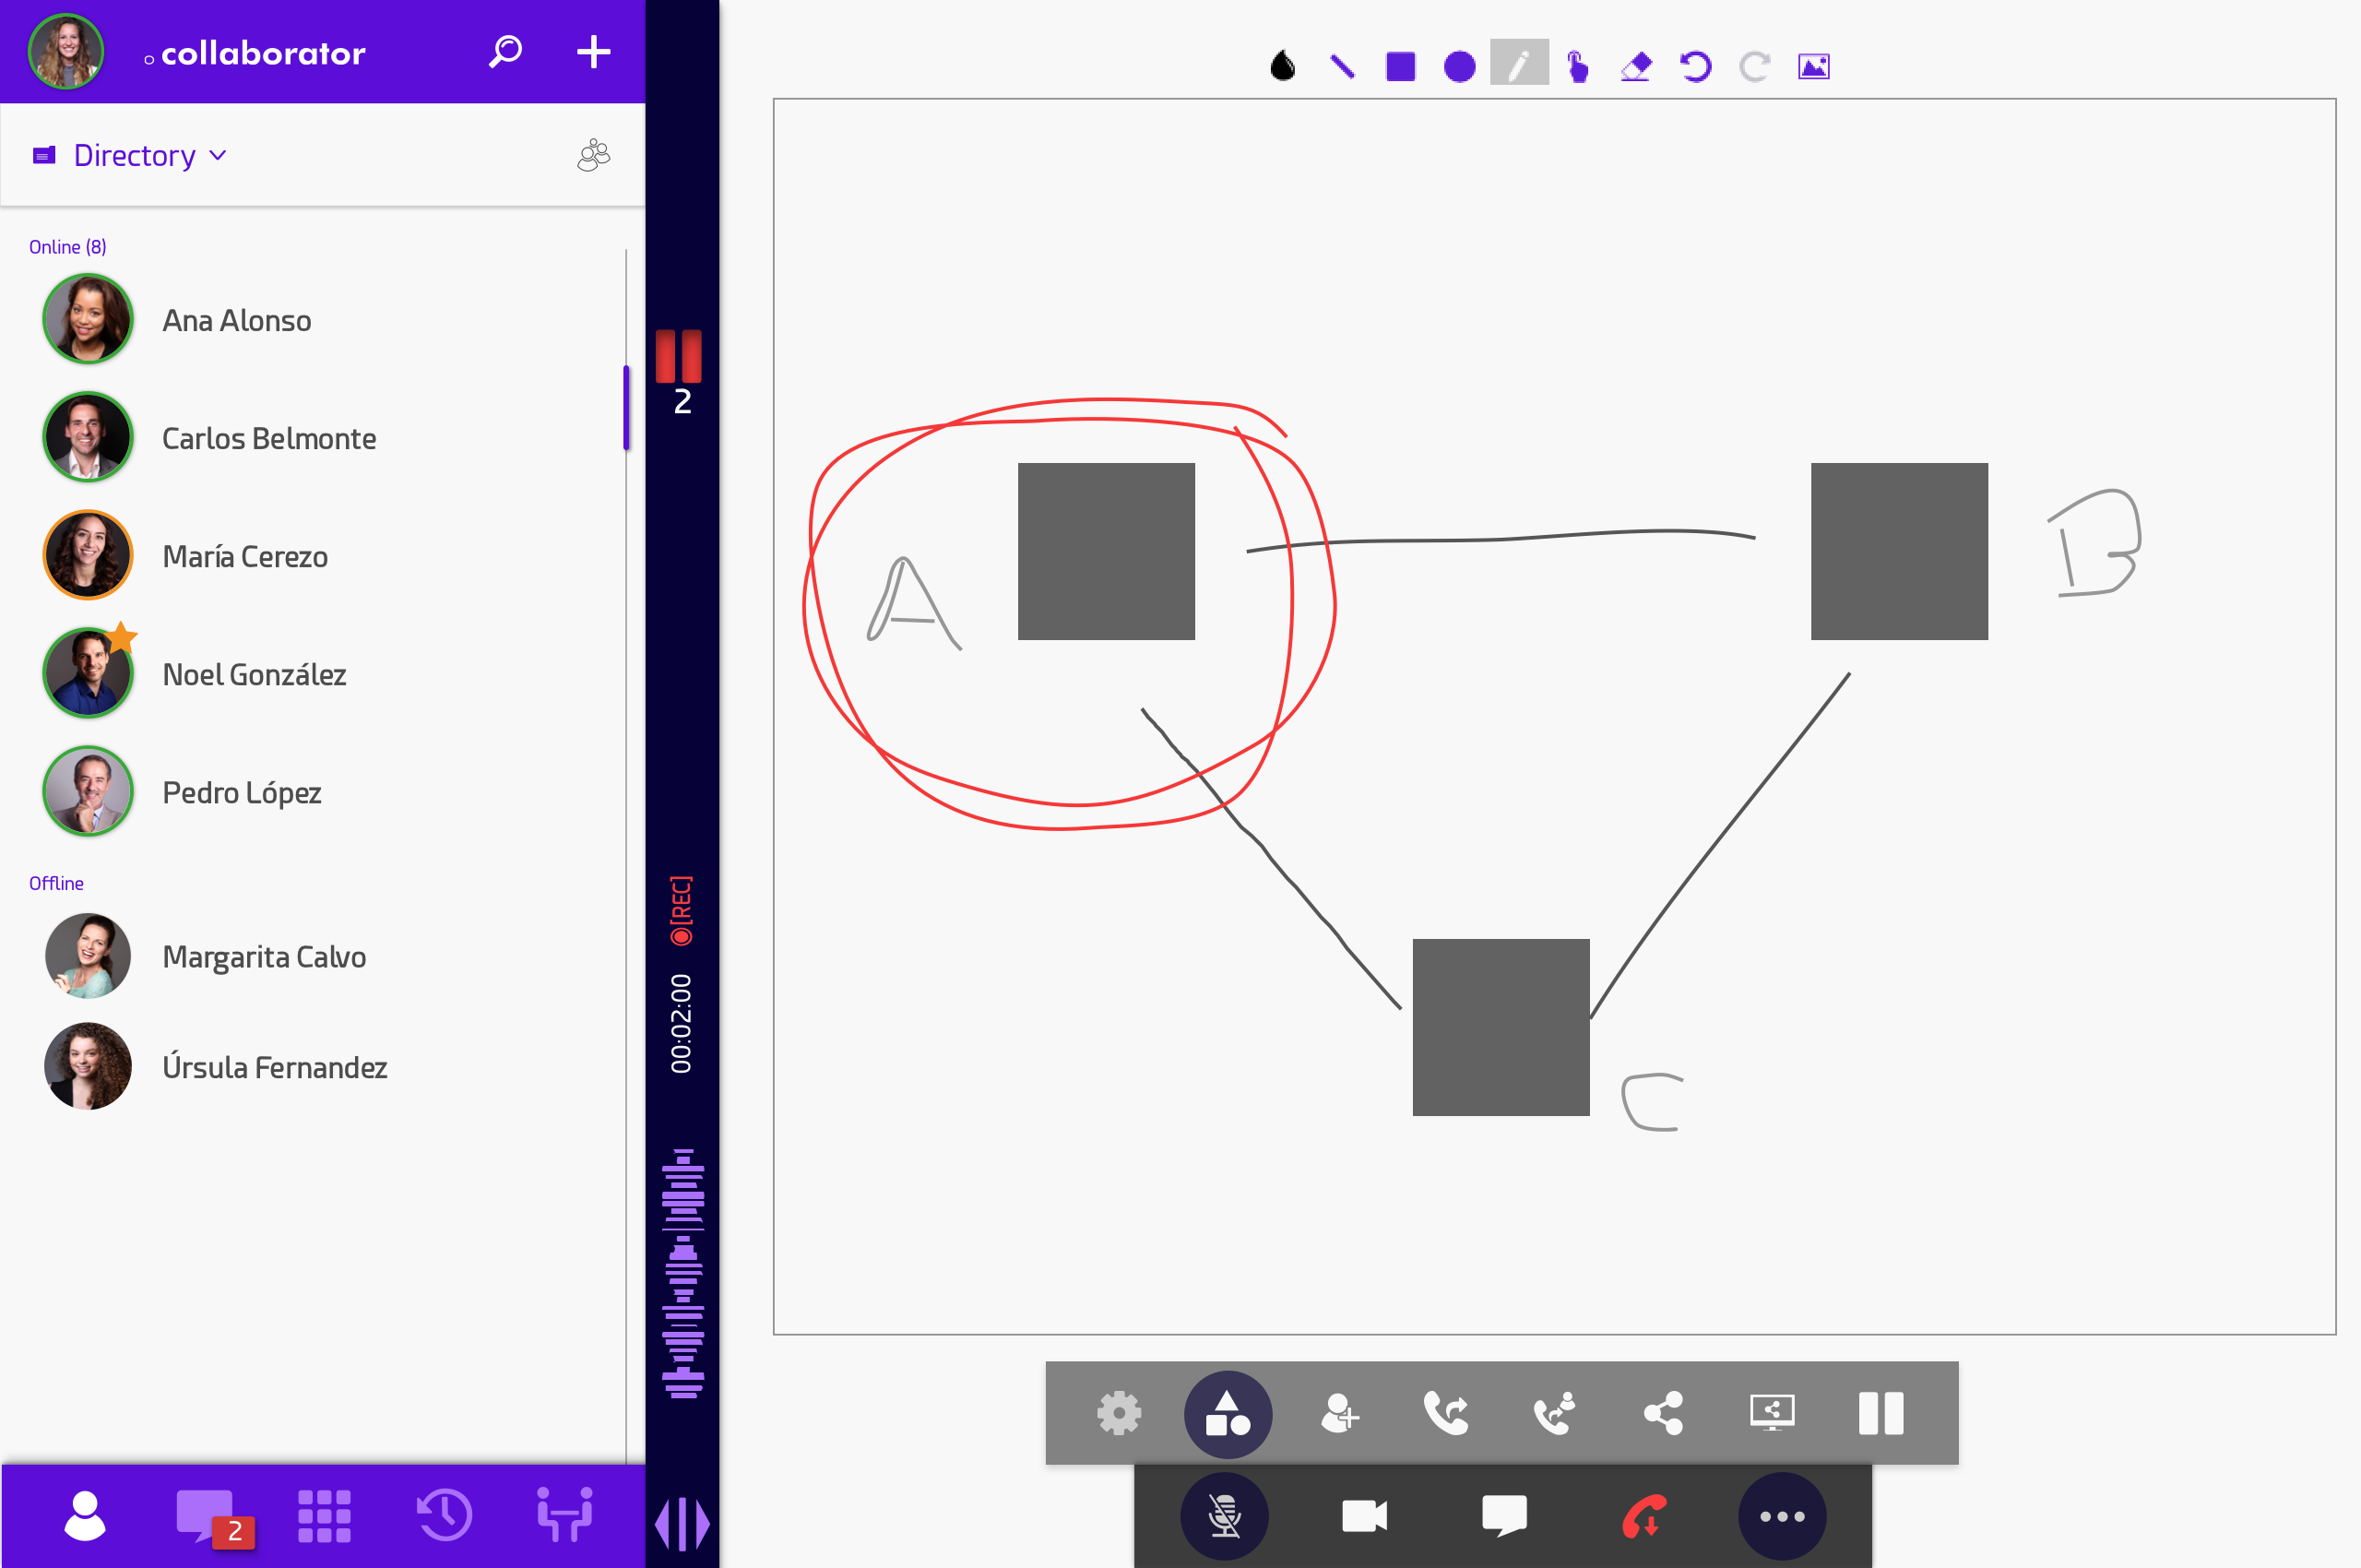
To stop the whiteboard session, simply click again on the icon. The icon will change back to its non-active base color.
The following drawing tools are available:
 Select color
Click here to select the color of your drawing tool
 Line drawer
Click here to draw lines of the selected color
 Square drawer
Click here to draw filled boxes of the selected color
 Circle drawer
Click here to draw filled circles of the selected color
 Free drawer
Click here to draw freely with your mouse using the selected color
 Move
MoveClick here to select and move a previously drawn object
 Eraser
Click here to select a drawn object and remove it
 Change background
Click here to select the base to use on the whiteboard and draw over it.
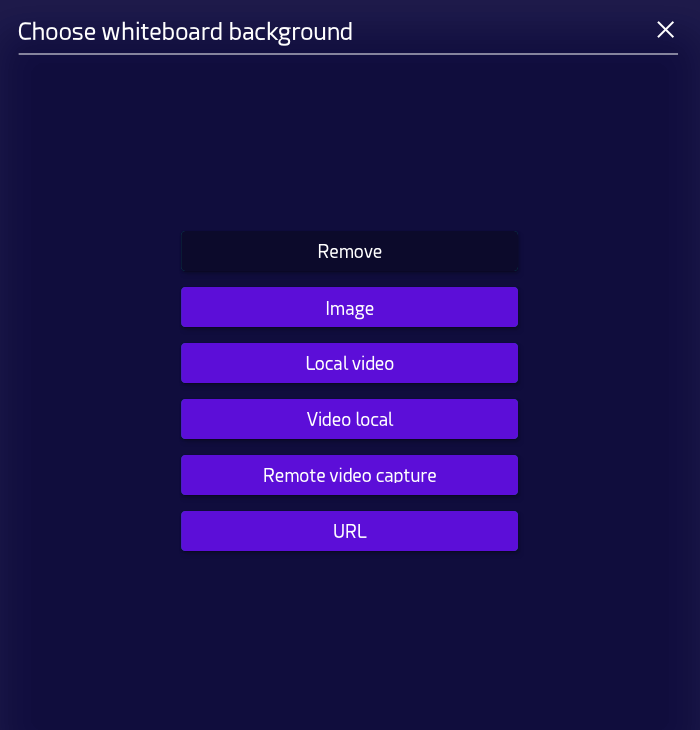
Current options include:
Local video
Fixed local video capture
Remote video
Fixed remote video capture
Fixed HTTPS image resources (shared link).
Note
Remote video and fixed remote video capture are only available when the call is between exactly two participants and the remote user is sharing video.
Video and video capture backgrounds are only available on video calls.
Whiteboard is not supported in mobile apps
A user can be logged in two devices and/or more than one browser. When a call is established in one of the devices, and the whiteboard is activated in the call, it has to be displayed in the device or browser where it was activated.
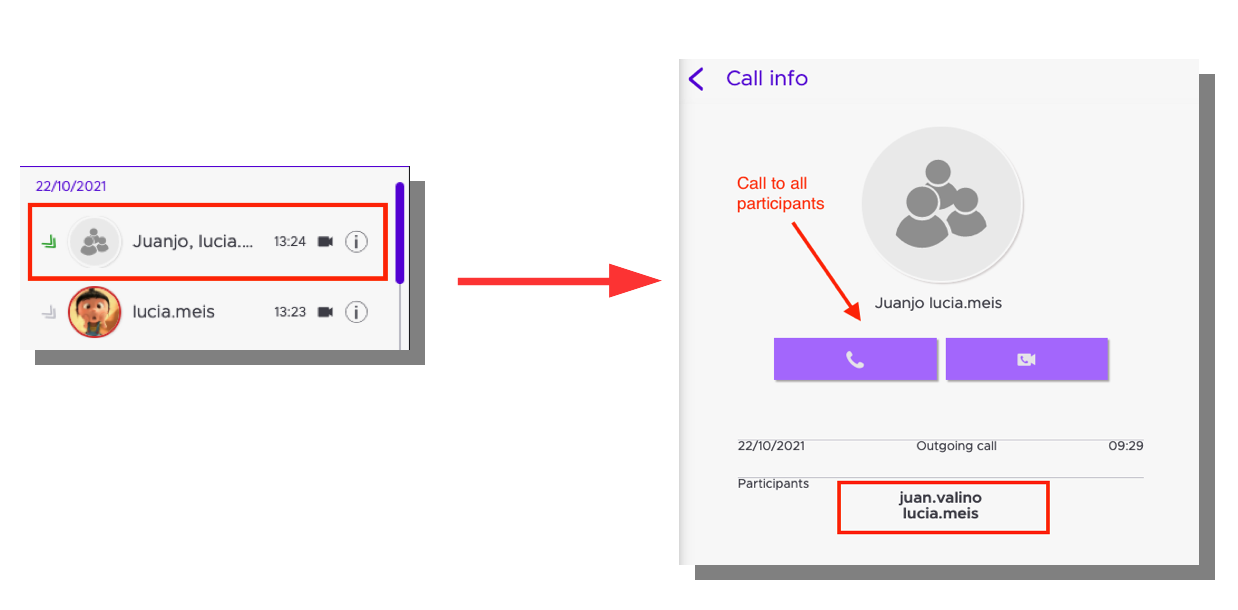
Call history
Quobis collaborator stores your call history allowing you to check your incoming and outgoing calls. Just click on the icon tab on the bottom navigation bar to show your call history. Using the call details, you can redial using audio or video from the corresponding buttons. Quobis collaborator will notify you about your last calls.
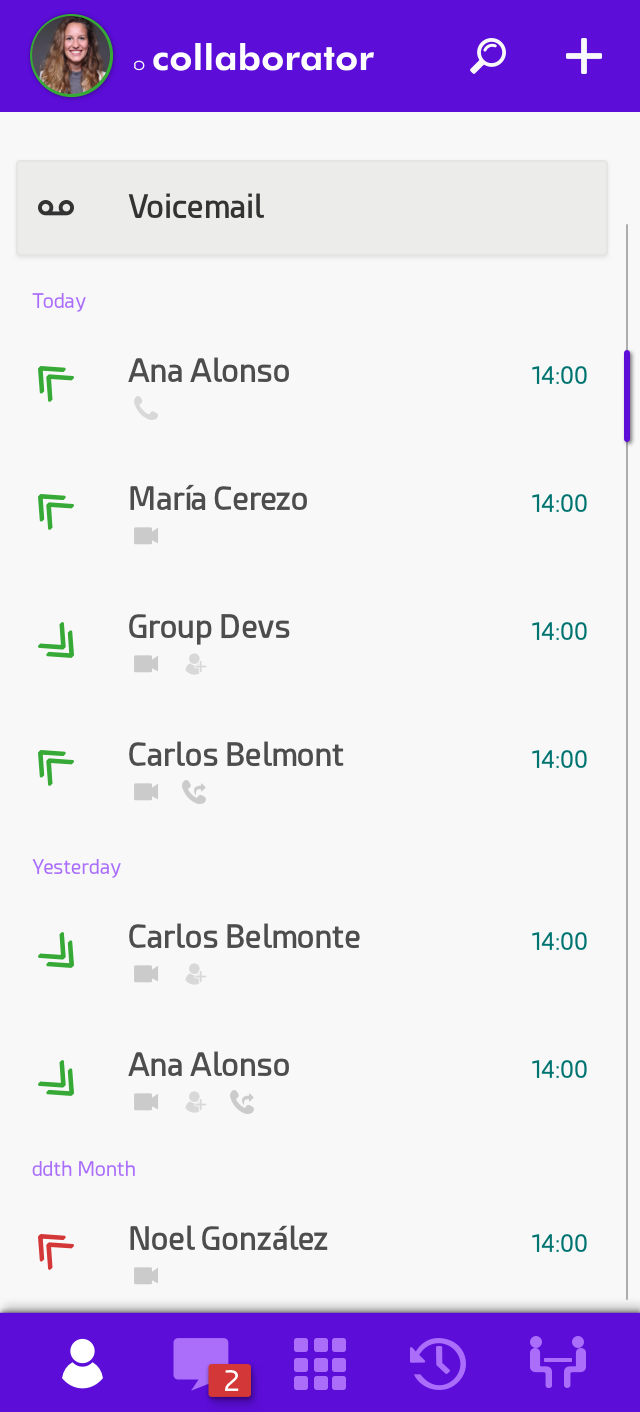
Entries are grouped by the date (daily) and each entry has the following information:
Name of the person that has participated in the call. In case of a multiparty call, the first participants are shown.
Avatar of the person that has participanted in the call. In case of a multiparty call, a “group” avatar is shown
Direction of the call: incoming or outgoing (up to down arrow for incoming calls, down to up arrow for outgoing calls)
Type of call: audio call or video call (different icons)
Hour of the call: corresponds to the date shown above
Info circle
 : that will show more information such as participants, duration, etc…
In order to redial, you just need to click on the entry and a call will be done to that user. Please note that you can also redial to more than one user if you click in a entry from a multi-party call as shown in the screenshots below:
When a user has received a missed call, the call-history icon will show a notification by means of a red dot which includes the number of missed calls that the user has received. Once the user clicks in the call history, regardless of the device where she is doing it, that notification will be cleared.
Missed calls received while the user is offline are also registered and notified.
