Authentication
Authentication is performed using OpenID Connect protocol. For more information about the details of OpenID Connect please refer to the official specification.
Keycloak (an OpenID Provider) is included in the product to allow authenticating to all the client applications with that need. Keycloak is an open source Identity and Access Management solution that works as OpenID Provider. An OpenID Provider is an OAuth 2.0 Authorization Server that is capable of Authenticating the End-User and providing Claims to a Relying Party about the Authentication event and the End-User. For more information about Keycloak please refer to the official documentation.
Obtaining an access token
For testing, development or administration purposes we may need to obtain an access token to be able to access the REST APIs. We can obtain one using the Direct Access Grants flow. This means that client has access to username/password of user and exchange it directly with Keycloak server for an access token. In terms of OAuth2 specification, this is called “Resource Owner Password Credentials Grant”.
1 POST https://<keycloak-host>/auth/realms/<realm>/protocol/openid-connect/token HTTP/1.1
2 Content-Type: application/x-www-form-urlencoded
3 {
4     grant_type: "password",
5     client_id: <client-id>,
6     username: <username>,
7     password: <password>,
8 }
Please note that you need to know both the username, password and client-id for this user. The conneciton can be achieved for example using a command-line curl with the following command:
 1 curl -X POST https://<keycloak-host>/auth/realms/<realm>/protocol/openid-connect/token -d "grant_type=password&client_id=<client-id>&username=<username>&password=<password>"
 2
 3 {
 4     "access_token": "eyJhbGciOiJSUzI1NiIsInR5cCIgOiAiSldUIiwia2lkIiA6ICJaTzQ5NFN1QjNBdThMcjMwVTRsQVoxdGNHVXZ2eXhYalA4VG5kNzV",
 5     "expires_in": 4200,
 6     "refresh_expires_in": 864000,
 7     "refresh_token": "eyJhbGciOiJy0BD7p9K6A-3Q11Yt3RLg",
 8     "token_type": "Bearer",
 9     "not-before-policy": 1647863488,
10     "session_state": "737cb7df-4d2f-41ca-a25a-e4066d8d9ef3",
11     "scope": "email profile"
12 }
And we can see the response with the requested access_token eyJhbGciOiJSUzI1NiIsInR5cCIgOiAiSld..... In order to use the access token, you just need to include it in the Authorization header like in the next example:
1curl -X GET https://rest-api-IP-of-your-system/sapi/users -H "Authorization: Bearer eyJhbGciOiJSUzI1NiIsInR5cCIgOiAiSldUIiwia2lkIiA6ICJaTzQ5NFN1QjNBdThMcjMwVTRsQVoxdGNHVXZ2eXhYalA4VG5kNzV"
Keycloak configuration
When adding a SAML v2 Identity Provider, please make sure that the parameter “Force Authentication” is set to “OFF” in order to properly logout. More information can be found in the Keycloack documentation site.
User session count limit
Keycloak’s last versions added a new variable that allows the system to limit how many sessions a user can create. In order to add this configuration, the Authentication Flows must be modified (Keycloak recommends, at least, Browser, Direct Grant and Reset Credentials).
The configuration for these limits is as follows:
{
"id": "92d5ac54-f1e6-4cef-907f-22f011526500",
"alias": "Sessionslimit",
"config": {
  "userClientLimit": "0",
  "behavior": "Deny new session",
  "userRealmLimit": "3"
}
It is required to add an alias, so it can be called in the different Flows. Limits and behavior can be configurable. Limits can be applied per client or per realm.
First one (userClientLimit) limits the maximum number of sessions a user can have with each client while the second one (userRealmLimit) limits the number of sessions per user in the whole realm
The behaviour defines how the limits work. The are two options:
Deny new session. If there are a number of sessions equals to the limit, it will deny the access to the new session.
Terminate oldest session. If the are a number of sessions equals to the limit, it will delete the oldest one an create another one session.
It is remarkable that a deleted session is not a logout. The session will be alive until the window or application are closed.
Automatic discovery of identity providers
By default, Keycloak presents a username/password form and a list of configured identity providers to the user. When a federated user wants to login via Keycloak, the user needs to choose an identity provider to get redirected. These instructions explain how to configure Keycloak to allow skipping the step of selecting an identity provider.
The idea is modifying the browser based login flow so Keycloak presents a username only form (i.e.: without password form and without the list of configured identity providers). User can then enter their email address and Keycloak will choose an identity provider based on the provided email domain and forward the user to the chosen provider.
Details about how to configure this functionality can be found here: https://github.com/sventorben/keycloak-home-idp-discovery/tree/v20.0.1#how-to-configure. A summary of the required steps is explained below:
Go to Authentication, Flows. Duplicate browser based login flow.
In the just created flow, add a new step “Home IdP Discovery” just before the part of the standard username and password form.
Bind the just created flow as “Browser flow”.
Associate the email domains with each ID provider:
Enter into the Keycloak container
Configure kcadm:
export PATH=$PATH:/opt/keycloak/bin
kcadm.sh config credentials --server http://localhost:8080 --realm master --user admin --client admin-cli
Associate ID provider to a domain
kcadm.sh update realms/<realm>/identity-provider/instances/<idp name> -s 'config."home.idp.discovery.domains"="example.com##example.net"'
Check out that it was correctly added:
kcadm.sh get realms/<realm>/identity-provider/instances/<idp name>
Single sign-on with personal certificates (X.509 Client Certificate Authentication)
A personal digital certificate, also known as “digital certificate” or Citizen’s Certificate, is a electronic certification issued by a public Certificate Authority that links the holder to a set of signature verification data and confirm his/her identity. It enables users to identify themsevles online and share information with other people and bodies, safe in the knowledge that only him and his/her interlocutor are able to access that information.
Quobis WAC can be configured to authenticate users using a digital certificate using the well-known X.509 standard. This is achieved by following these steps:
In the Keycloak “Authentication” section, you need to add a new authentication type as shown below. Please make sure that it’s set as “Required”:
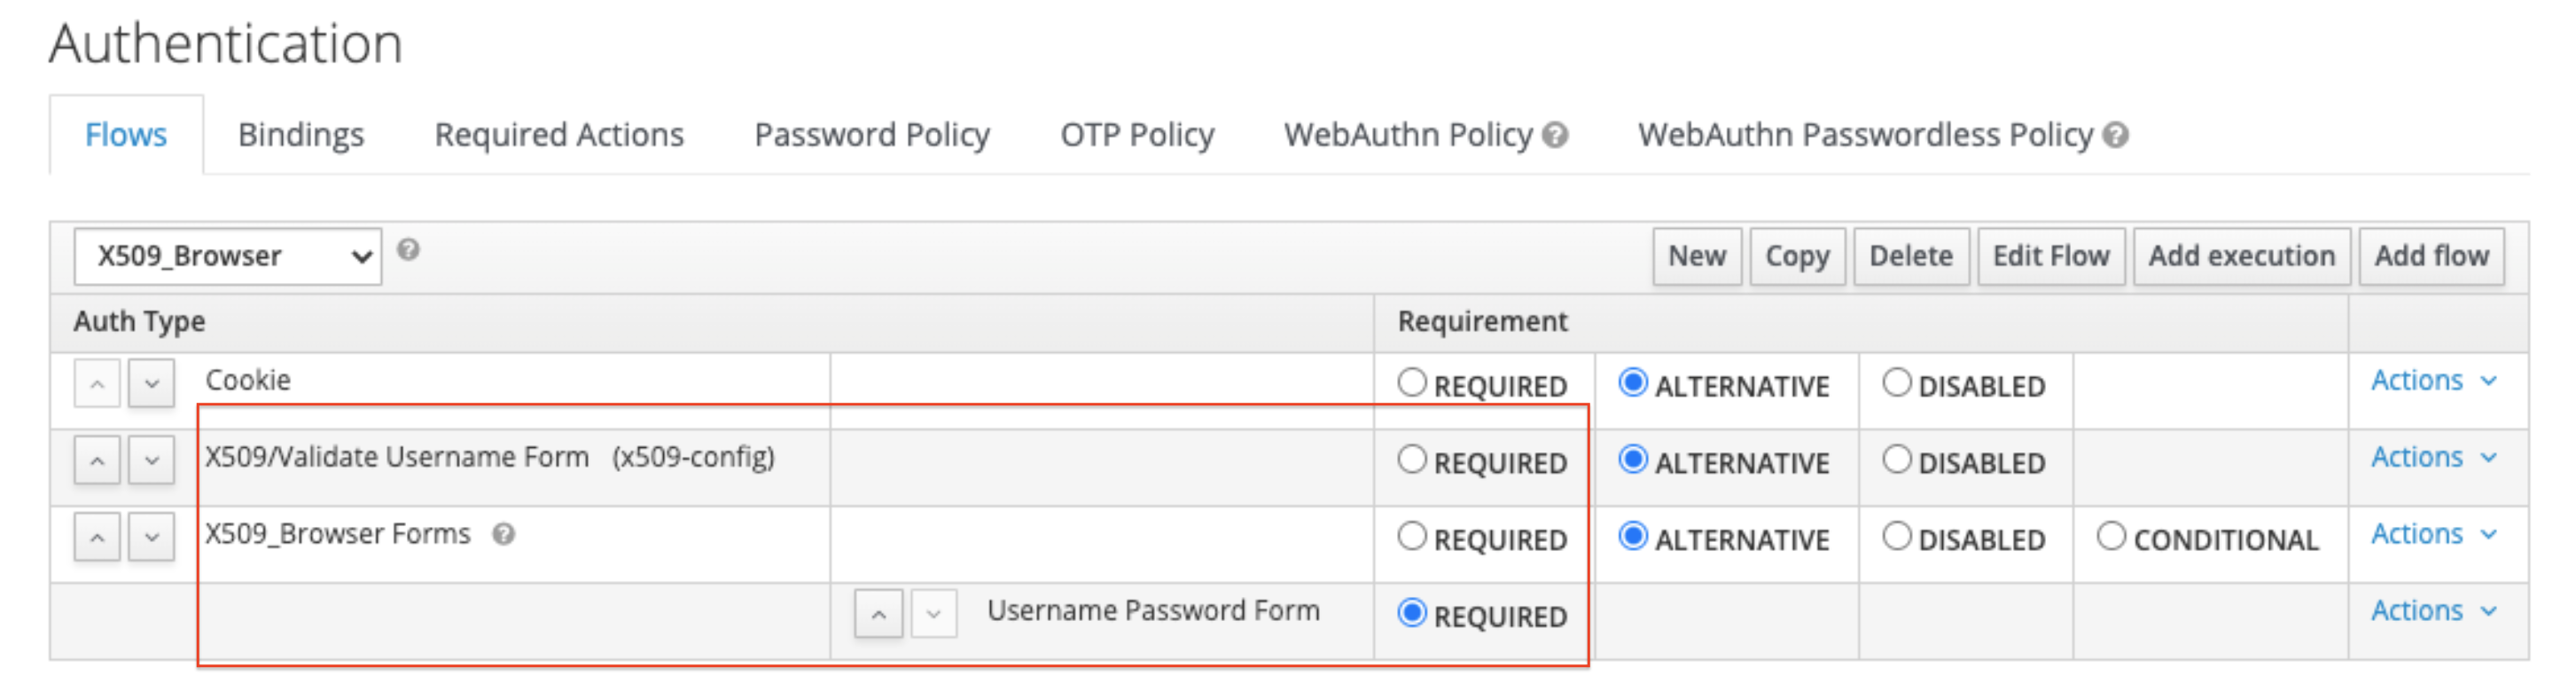
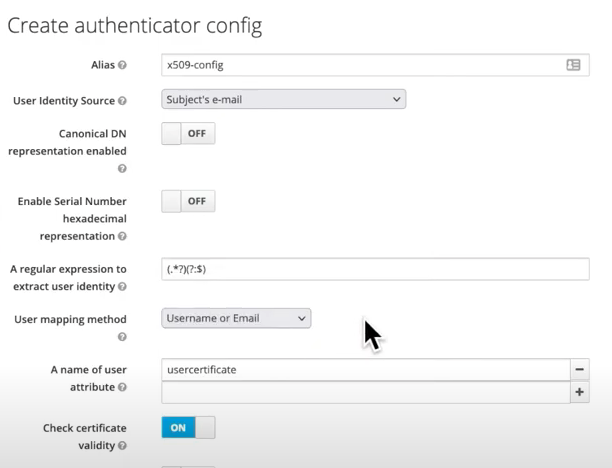
A new “authentication flow” needs to be created. Select “certificate serial number” or any other atribute as the user identity source. The certificate identity mapping can be configured to map the extracted user identity to an existing user’s username or e-mail or to a custom attribute which value matches the certificate identity. For example, setting the Identity source to Subject’s e-mail and User mapping method to Username or email will have the X.509 client certificate authenticator use the e-mail attribute in the certificate’s Subject DN as a search criteria to look up an existing user by username or by e-mail. There are other optional features available here such as the extended certificate validation or to check the revocation status with different methods.
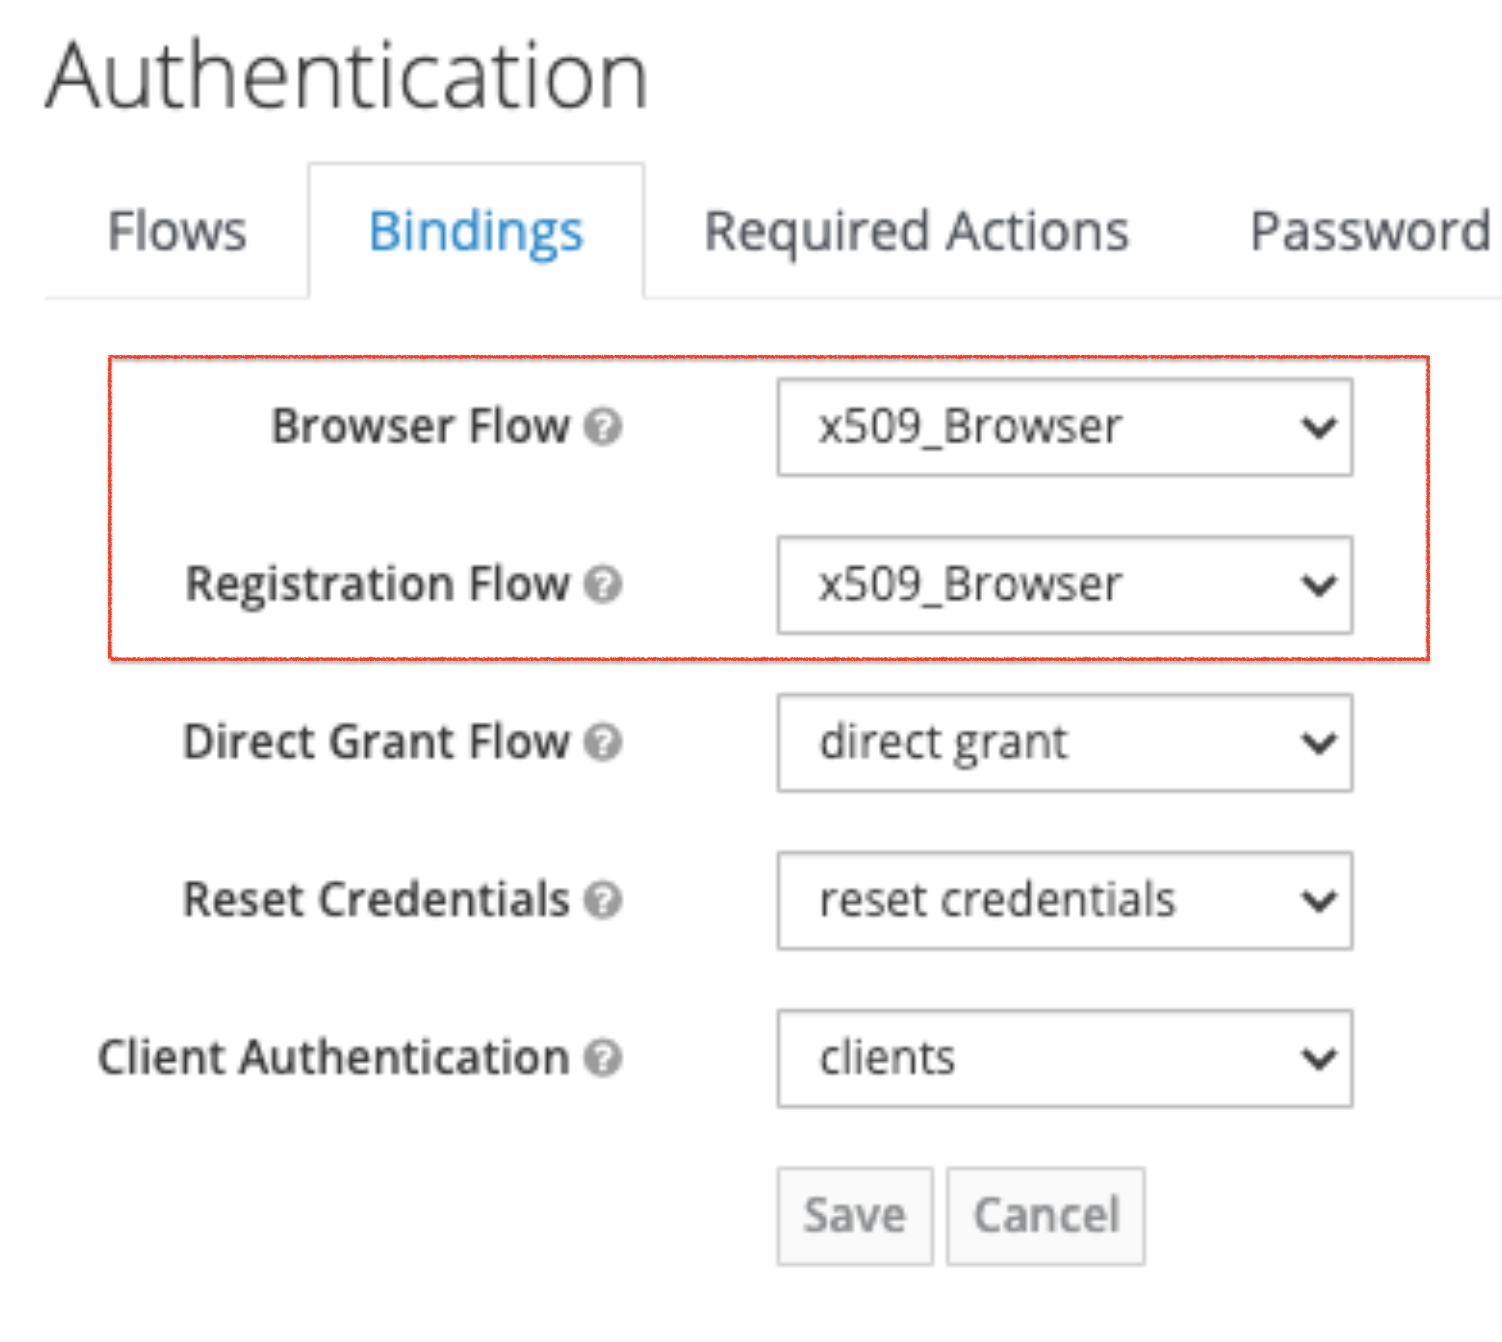
This new authentication flow that you have just created needs to be added in the Bindings section as shown below:
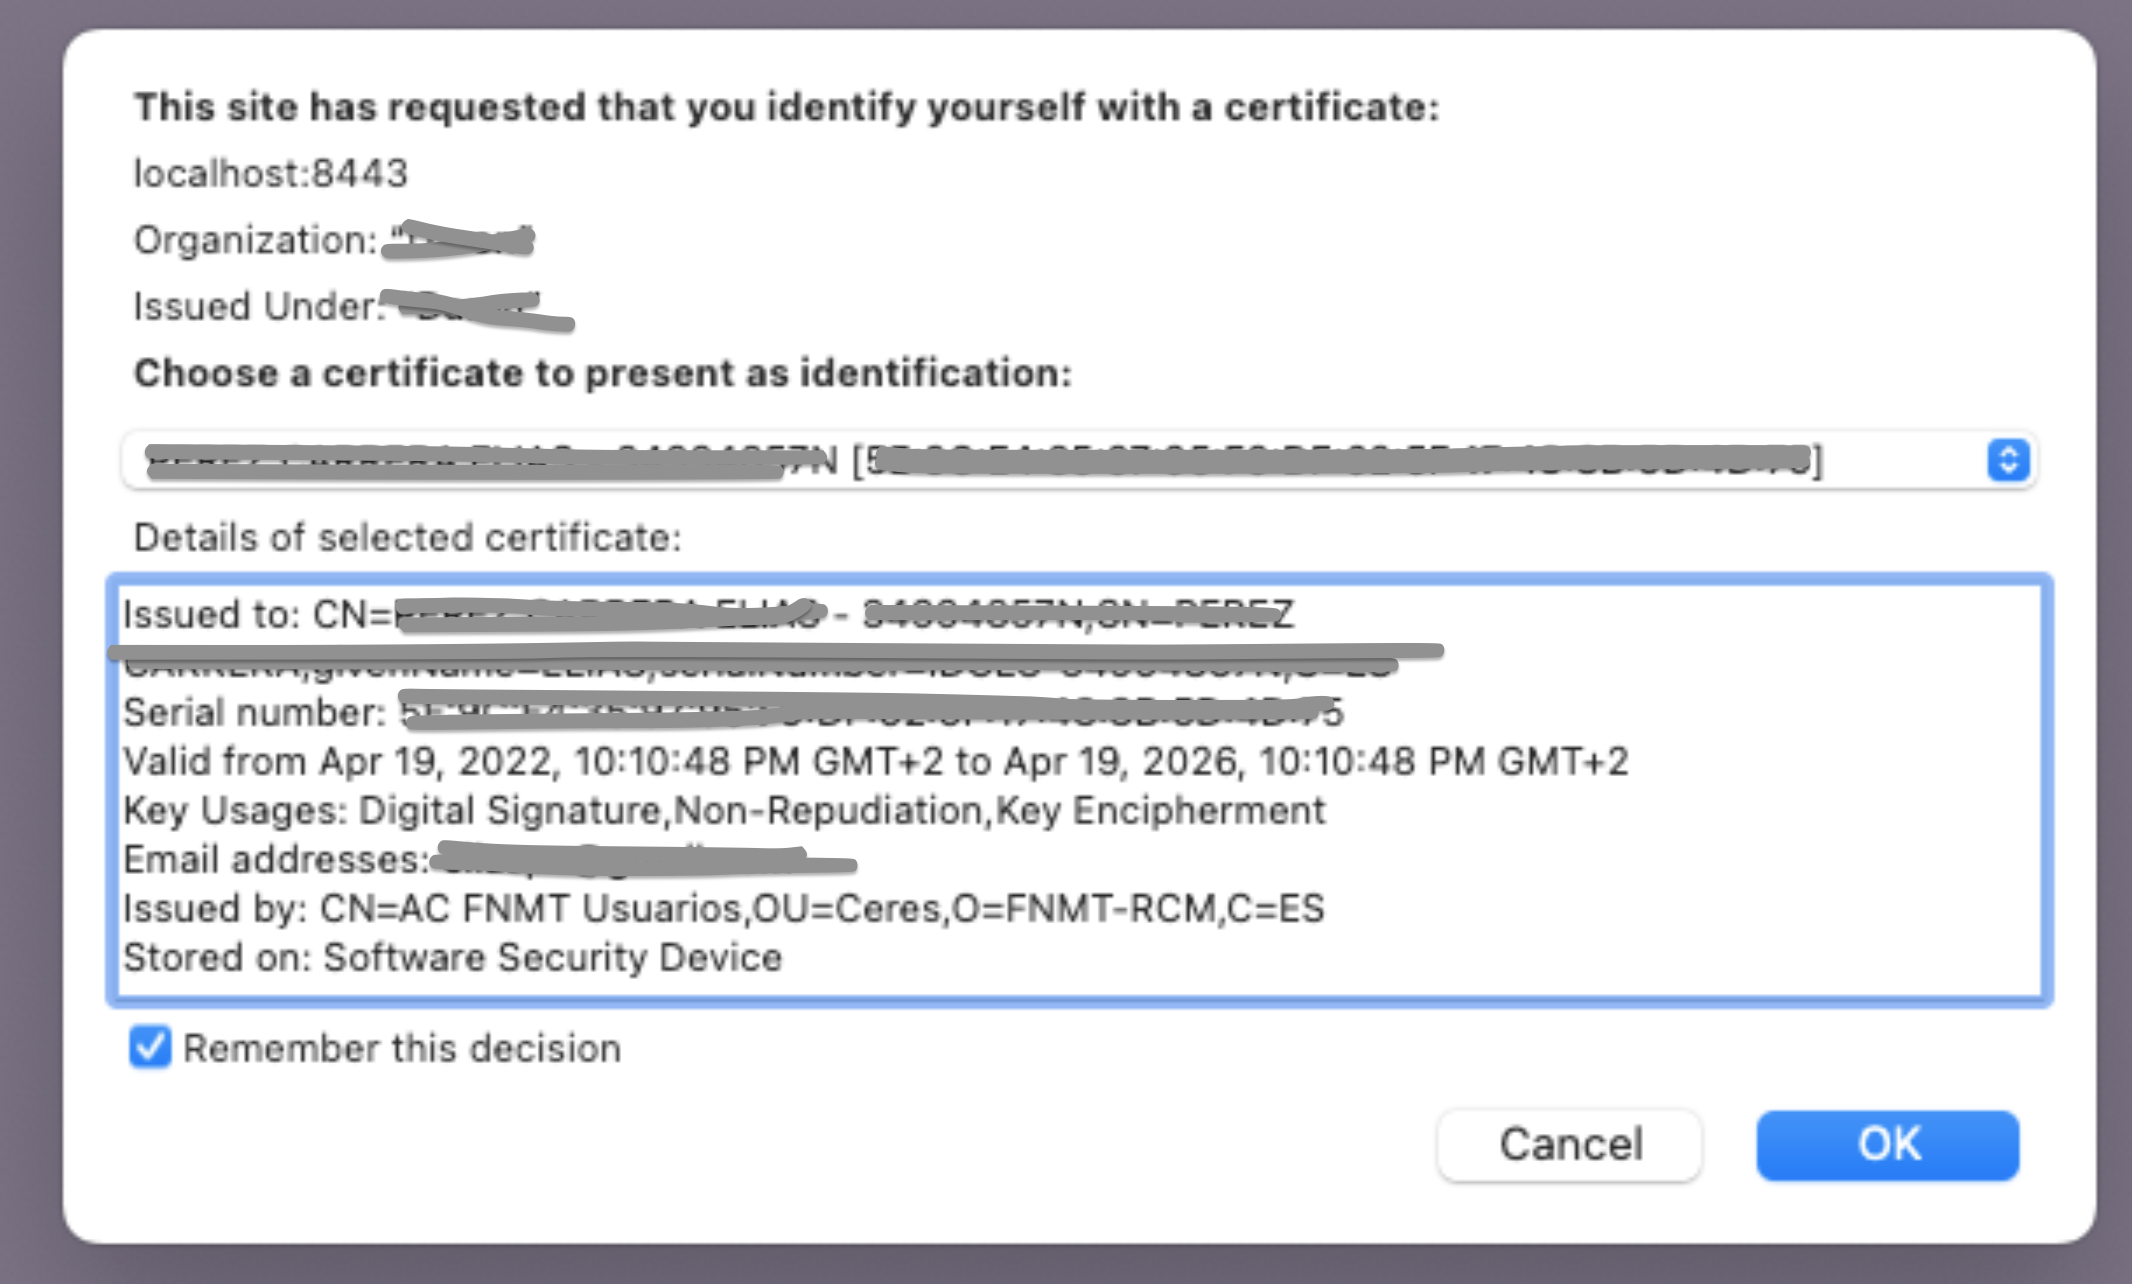
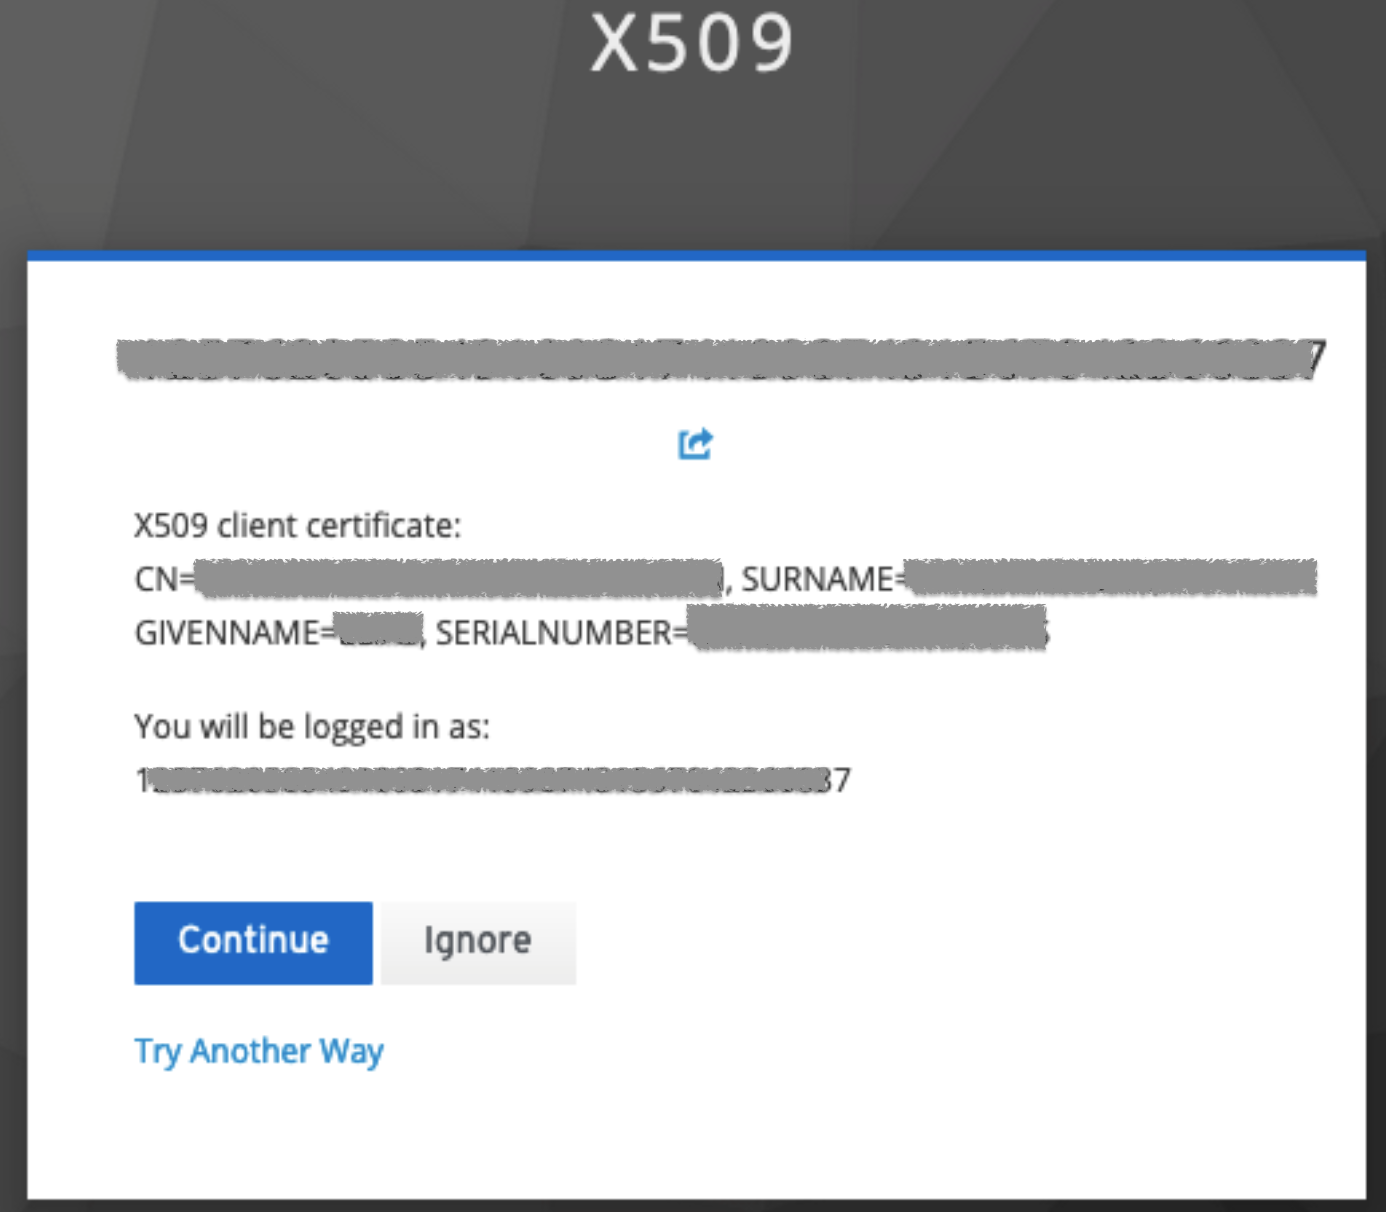
Once this is configured, new users will see a pop-up window where the browser will inform the user that a user certificate will be used and shared with the server for authentication (some information has been removed for privacy reasons):
After that pop-up window, Keycloak will specify again the details of the digital certificate and the user can either accept or fallback to another authentication mechanism by clicking on “Try another way”
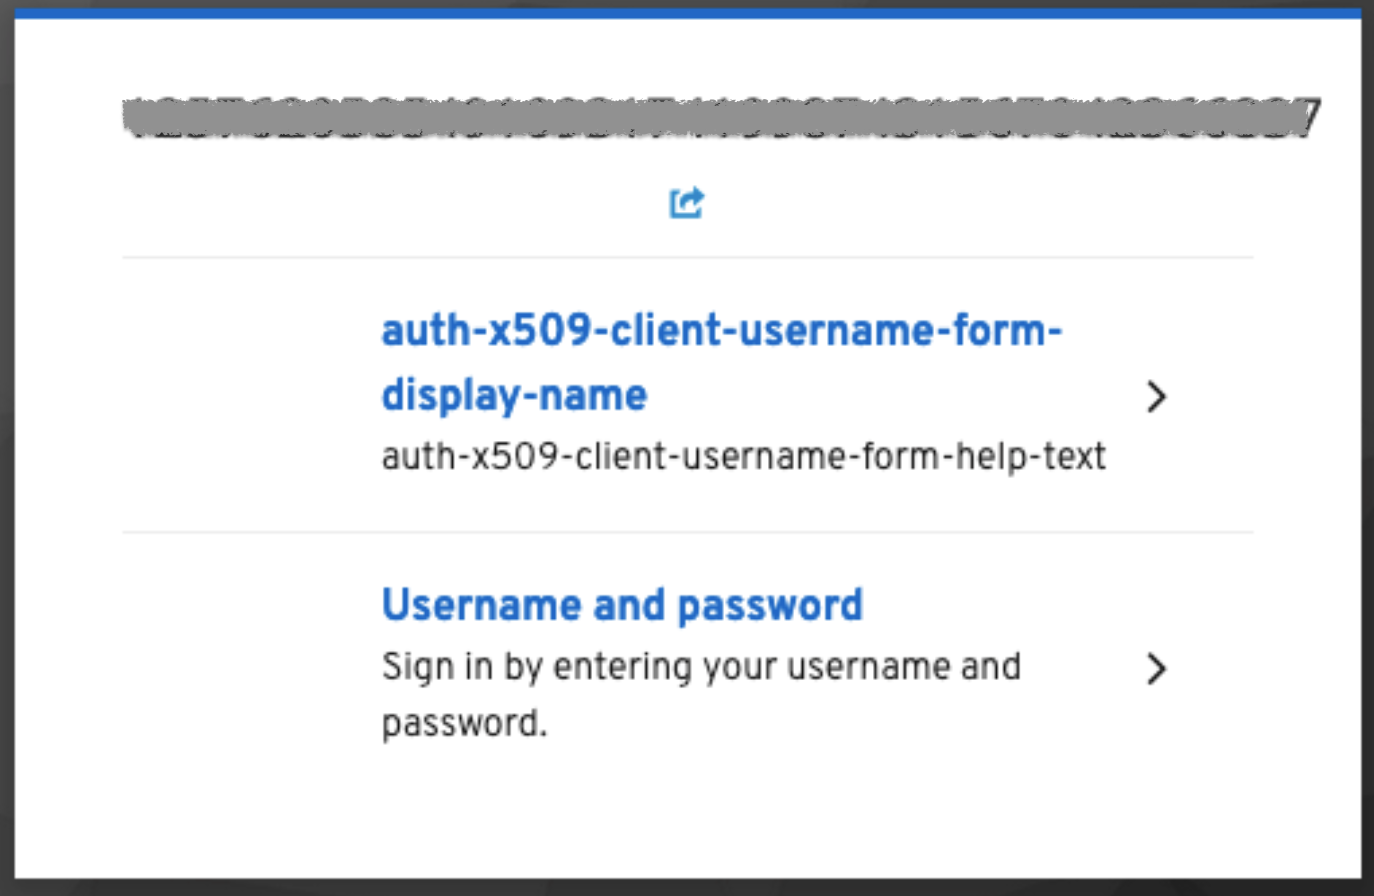
This is the fallback window shown when the user chooses to login with another method:
More information can be found in the Keycloak documentation: https://www.keycloak.org/docs/latest/server_admin/#_browser_flow
Single sign-on (SSO) with Google
Keycloak can be configured to delegate authentication against Google identity services to implement a Single sing-on service (SSO). This chapter describes the configuration needed both in the Google console and the Keycloak server.
Google console configuration
Create a project in console.cloud.google.com.
Go to “OAuth consent screen” and select which users are allowed to login:
Internal: Users accounts from our organization
External: Every Google account
Fill the following fields: App name, User support email, Authorized domains & Email addresses
Go to “Credentials” and Create Credentials with OAuth client ID
Use “Web application” as Aplication type and fill its name.
Copy the “Authorized redirect URI” from our Keycloak console→ Identity Provider→ Google → Redirect URI
Keycloak
Select “Google” from the “Identity Providers” section in the realm that you want to use for this authentication scheme.
Get the ID and Secret from the credentials created before.
Go to “Authentication” and Create Flow with “Detect existing broker user” and “Automatically set existing user”
Configure Google in “Identity Provider” to use this Flow as “First Login Flow”.