The objective of this tutorial is to achieve a basic chat component. We will implement a 1-to-1 chat, that is the simplest implementation that we can do. Also it is a good starting point to explain the basic about messaging.
Once you finish this tutorial, you will be able to modify this example in order to support chats with several participants.
It the next tutorial we will use this chat as a key piece for implementing file sharing.
To perform this tutorial we will take as an starting point the result of the tutorial 3 - Contacts.
So on the following link you will find the following structure:
project/
├──js/
|   ├── libs/
|   │   └── sippojs-40.0.0.js
|   ├── services/
|   │   ├── auth.js
|   │   └── contacts.js
|   ├── utils/
|   │   └── logger.js
|   └── app.js
├── index.html
└── style.css
We are going to create a new service called ChatService for this tutorial.
We will work with the following files:
index.html: Includes a new panel to work on this tutorial. We will go for it on next steps.app.js: Initialize the services and expose the public methods to the interface.contacts.js: Service used to retrieve contacts and build valid JIDs for chat targets.chat.js: Service that allow us to use 1-to-1 chats.
The first step is to analyze all the Quobis sdk-js classes, methods and events that we will use for creating our application. This way we will understand better how Quobis works and we will discover new features that can be implemented.
Take your time to check all of them and discover all their capabilities.
3.1. Classes
The main classes that we will use for implementing our new features are the following:
- Chat: Provides access to methods for managing a chat room. See
ChatManagerto find how Chat objects are obtained. - ChatManager: Provides access to methods for using chat. A Chat manager object is obtained by calling the
Session.getChatManager()method.
3.2. Methods
These are the main methods that we will use:
- Session.getChatManager(): Retrieves the chat manager.
- ChatManager.getIndividualChat(participant: string): Obtains an individual chat with the specified user.
- Chat.sendText(text: string): Sends a new text message.
3.3. Events
And finally we will subscribe the following observable from the Chat class:
messages$: Emitted every time the messages List changes.
We are going to create a chat panel.
Open your index.html file and add some input:
- A text field to specify the chat destination.
- An init chat button.
- One panel to include the sent and received messages.
- And a message input field among with a send button.
<div class="panel">
        <h3>Chat panel</h3>
        <label>Callee:</label>
        <select id="users-select"></select>
        <button onclick="initChat()">Init Chat</button>
        <br>
        <div id="chat-messages"></div>
        <input id="chat-input" type="text" >
        <button onclick="sendChat()">Send</button>
</div>
Finally, do not forget to add the service that we will create to our index.html:
<!-- App services -->
<script src="js/services/auth.js"></script>
<script src="js/services/contacts.js"></script>
<script src="js/services/chat.js"></script>
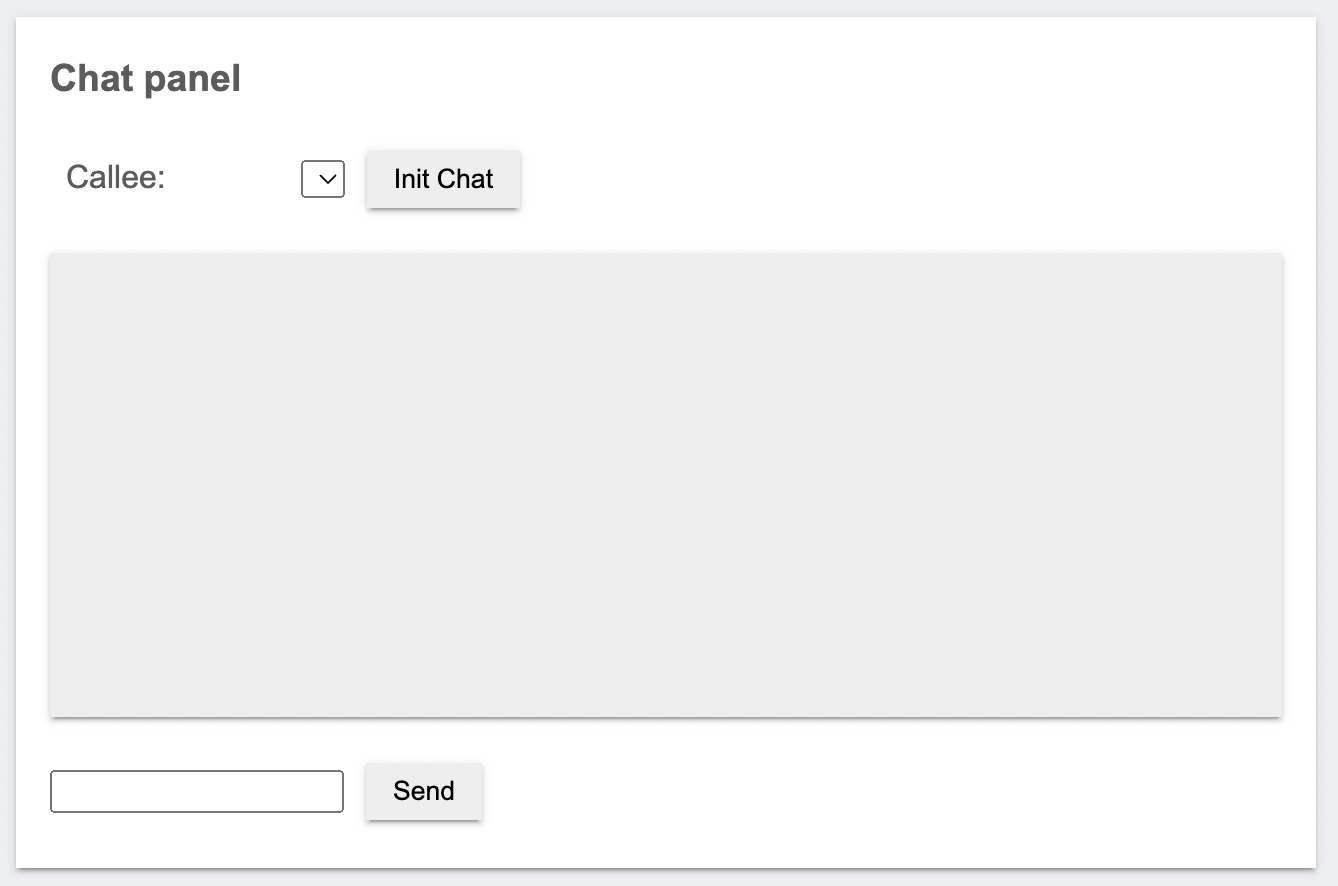
Current UI status should be similar to the following one:
Now we will open the file app.js and define the public methods that will use our interface. Take into account that we will put some references to the ChatService that will define in the next steps.
The first thing that we need to do is to initialize the services:
// Define the services
let logger = new LoggerService();
let authSvc = new AuthService();
let contactsSvc = new ContactsService();
let chatSvc = new ChatService();
And remember that we need to broadcast the session object each time that the user is registered or de-registered. Modify your app to use setSession when refreshing:
function _refreshSession() {
  // Save the session in the other services
  let session = authSvc.getSession();
  chatSvc.setSession(session);
}
Ok, so it's time to empower our app.js to provide the chat features required.
function initChat() {
  const jid = document.getElementById('users-select').value;
  logger.log('Trying to init chat with jid: ' + jid);
  chatSvc.initChat(jid, _onChatMessages).then( () => {
    logger.succ('Init chat successful.');
  }).catch( () => {
    logger.error('Cannot init chat. Are you registered?');
  });
}
function sendChat() {
  let text = document.getElementById('chat-input').value;
  logger.log('Trying to send chat message: ' + text)
  chatSvc.sendText(text).then( () => {
    document.getElementById('chat-input').value = '';
    logger.succ('Chat message send successful.');
  }).catch( () => {
    logger.error('Cannot send chat message. Was the chat initialized?');
  });
}
But...wait a moment! We have defined a _onChatMessages function that is passed to the initChat method. Ok, no problem. This is a callback function that is launched each time we receive a change in the array of messages useing a observer.
But we need to filter the messages because this observer returns the list of messages any time one of then change their status (sendig, sent, received, error...). We use the id of the message to detect if that message has been rendered
This function will print the new messages in the interface and we define this function also in the same file:
function _onChatMessages(message) {
  if (!message) return;

  const elementId = 'msg' + message.id;
  if (document.getElementById(elementId)) return;

  let container = document.getElementById('chat-messages');
  let messageEl = document.createElement('div');
  let usernameEl = document.createElement('div');
  let textEl = document.createElement('div');
  messageEl.id = elementId;
  messageEl.className = 'message ' + message.getDirection();
  usernameEl.innerHTML = message.getComposer();
  usernameEl.className = 'username';
  textEl.innerHTML = message.getData();
  messageEl.appendChild(usernameEl);
  messageEl.appendChild(textEl);
  container.appendChild(messageEl);
  // Autoscroll messages
  messageEl.scrollIntoView();
}
And we need another small change: to init chats we need to use a real user JID. Build it as contact.user.username@contact.user.domain in the getUserList function:
function getUserList() {
  logger.log('Trying to get user list');
  let session = authSvc.getSession();
  contactsSvc.setSession(session);
  contactsSvc.getUserList().then( (contacts) => {
    logger.succ('Get user list successful.');
    const userSelect = document.getElementById('users-select');
    userSelect.innerHTML = contacts.map(contact => {
      const username = contact.user?.username;
      const domain = contact.user?.domain;
      const jid = (username && domain) ? `$@$` : contact.id;
      return `<option value="$">${contact.name}</option>`;
    }).join('');
  }).catch( (e) => {
    console.log(e);
    logger.error('Cannot get user list. Are you registered?');
  });
}
Now our buttons are functional and you can invoke app methods from you UI. We are going to link these functions with some active actions.
The next step is to create our new service and include in particular the two methods that we are using: initChat and sendText.
First of all create js/services/chat.js file and include the constructor with the required elements:
const ChatService = (function() {
  class ChatService {
    constructor() {
      this.session = null;
      this.currentChat = null;
    }
  }
  return ChatService;
}());
As done on the other tutorials, we need to inform this ChatService about the existence of an active session, required to invoke the required features from the Quobis sdk-js.
Include the setSession public method inside the ChatService class:
setSession(session) {
  this.session = session;
}
The first step is to get the chat with another user. Take into account that the initChat method has two input parameters:
callee: The other participant in the chat.onMessagesCallback: Function that is called each time we detect an incoming or outgoing message.
Once the chat is correctly initialize, we save the chat in the this.currentChat variable and return a promise:
  async initChat(callee, onMessagesCallback) {
    if (!this.session) {
      return Promise.reject();
    }
    const chatManager = await this.session.getChatManager();
    this.currentChat = chatManager.getIndividualChat(callee);
    this.currentChat.messages$.subscribe(messages => onMessagesCallback(messages.last()));
    return Promise.resolve(this.currentChat);
  }
We get the chatManager instance to subscribe to the messages$ observable, and we use it to send the last message to the callback to render it.
Ok, so our Chat object is created and the this.currentChat variable reflects it. We can use this object to send our messages out there taking advantage of the Quobis sdk-js features.
sendText(text) {
  if (!this.currentChat) {
    return Promise.reject();
  }
  return this.currentChat.sendText(text);
}
And this is all. Now we are able to send chat messages:
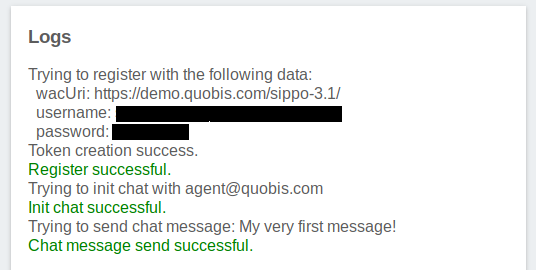
You can appreciate how easy is to implement a 1-to-1 chat solution. The Quobis sdk-js abstraction layer will allow you to reuse the same app mechanics for multiple environments. And it completes one of the extra basics for UC: Instant messaging.
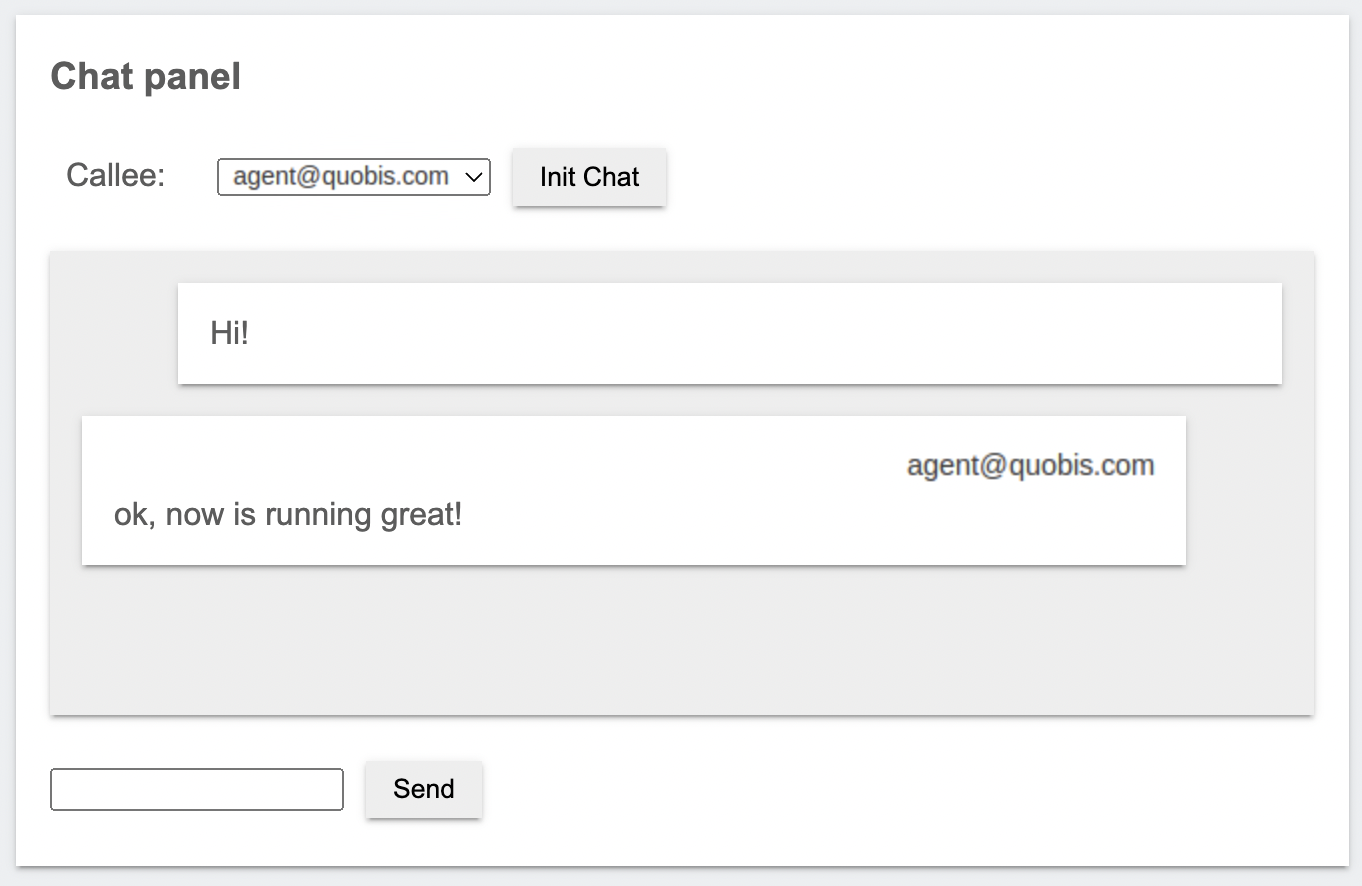
When executing the result should be similar to the following one:
On the next tutorial we will keep expanding the chat. Now we can send messages...but...what about sending a video with shinny kittens? How to send? Jump for the next tutorial.
Do not hesitate to contact Quobis if you have any question or to provide feedback info@quobis.com
#alwaysImproving